Chapter 3 – New Feature
Chapter 3.4 – SMTP Email
1) SMTP Email
- Send by Email (via SMTP Server)
- Send by Email (MS Outlook compatible)

1.1 “Send by Email (MS Outlook compatible)” requires an installed email application.
1.2 “Send by Email (via SMTP Server)” does not require email application installed.
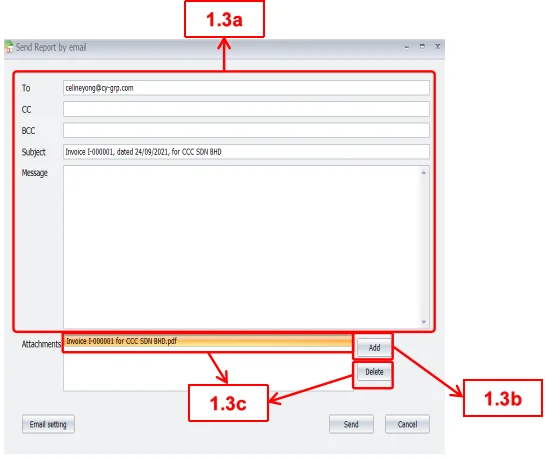
1.3d “Email Setting” allows you to set up mailing server settings.

1.4 “Maximum emails to send concurrently” allows you to set the maximum number of emails to be processed concurrently. (A higher number consumes more RAM.)

2) How to Setup SMTP Email Setting
2a Gmail.
2a.1 Click Profile Icon → Manage your Google Account.

2a.2 In the Google Account tab, click Security.

2a.3 Signing in to Google → 2-Step Verification.

2a.4 Press Get Started to start setting up 2-Step Verification.

2a.5 The device that uses the Gmail will show up.
2a.6 Click Continue to proceed with the selected device.

2a.7 The phone number of the device will show up.
2a.8 Check the number and choose the method to get code.
2a.9 Click Send to proceed.

2a.10 Insert the code you have gotten from text or call.
2a.11 Click Next to continue.

2a.12 Click Turn On and enable 2-Step Verification.

2a.13 Back to Google Account → Click on Security.

2a.14 Signing in to Google → Click on App Passwords.

2a.15 Proceed to App passwords in the new tab.

2a.16 Click Select app and choose Other.

2a.17 Insert the name.
2a.18 Click on generate to get app passwords.

2a.19 The generated app password will show up.
- Copy the app password and save it in a document to use it again.
2a.20 Click Done to complete action.

2a.21 Unable to preview created app password.
2a.22 Click the trash can icon to delete the app passwords.

2a.23 To set up SMTP email for Send by Email and Batch Mail, return to AutoCount.
2a.24 To send by email via SMTP Server, click the Send by Email button in the Preview window.

2a.25 To set up SMTP email, click Email setting.

2a.26a To find the SMTP server and port number, search for “Gmail SMTP Port Setting” on Google.
2a.26b You can enable SSL2 using the first checkbox. You can use the email address below by checking the second checkbox.
2a.26c User Name is your email address and Password is the App Password.
2a.27 Enter your sender name and email address.
- Gmail allows the email to be different from the SMTP server setting’s user name.
2a.28 Send a test email before clicking OK to check that the setup is correct.

2a.29 You will see the image below when you have successfully set up.

2b Outlook.
2b.1 Log in to your Outlook account and click the gear icon in the top right corner.

2b.2 Click View all Outlook settings at the bottom of settings tab.

2b.3 In the Settings window, click Mail.

2b.4 Select Sync email.

2b.5 POP and IMAP → Let devices and apps use POP → Yes.
- Exchange Online(Offline 365 or Microsoft 365)
- If the option is grayed out, you need to enable SMTP AUTH for your email account.

2b.6 Outlook has provided SMTP settings at the bottom. Click Save to proceed.

2b.7 The Batch Mail feature is in the Debtor/Creditor Statement Report.

2b.8 Batch Mail → Others → Email Setting.

2b.9 Your Outlook username and from email address must match, and your password is your Outlook password.

3) Steps to enable SMTP AUTH for specific mailboxes
3.1 Go to the Active Users page in the Microsoft 365 admin center.
3.2 Select the user and click the Mail tab in the flyout that appears.
3.3 Click Manage email apps in the Email apps section.
3.4 Verify the Authenticated SMTP setting: unchecked = disabled, checked = enabled.
3.5 When your’re finished, click Save changes.
3.6 Back to the user’s mailbox, under Let devices and apps use POP, select Yes.