Chapter 8 Sales & AP Module
8.1 Debtor Maintenance
This is to maintain your debtor account
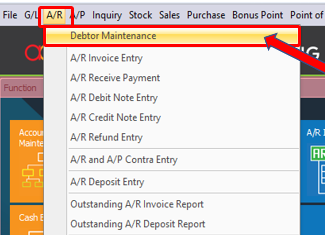
First, go to A/R > Debtor Maintenance and debtor listing will be displayed
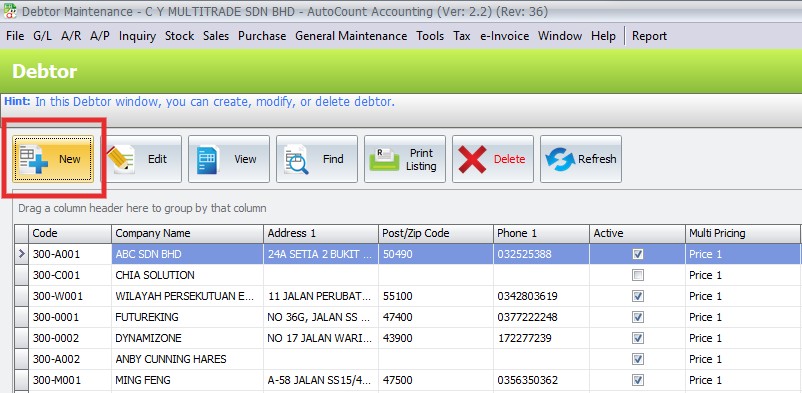
Click on NEW to create a new debtor, or select existing debtor and click EDIT to edit information
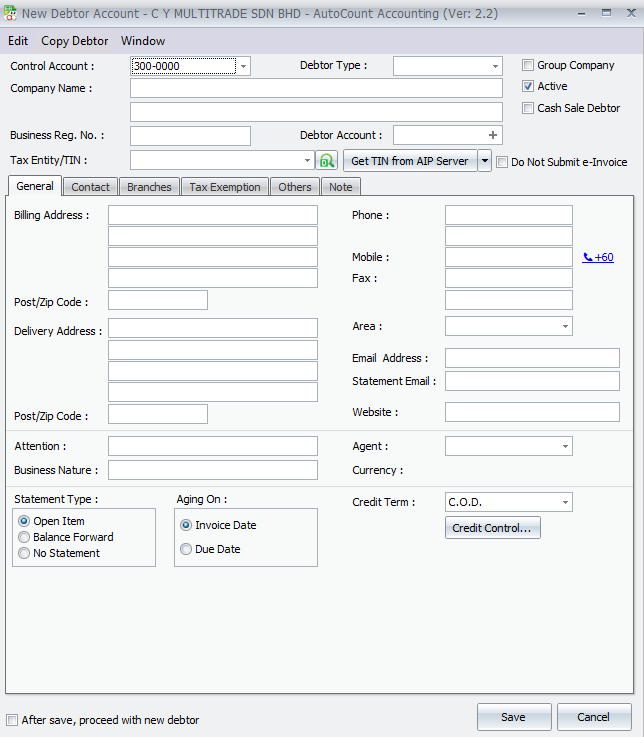
1. Control Account: choose the control account for this debtor
2. Debtor Type: select a debtor type (for report filtering purpose). Debtor type is maintained at General Maintenance > Debtor Type Maintenance
3. Group Company: if this is checked, it means this debtor account is the control account of a group company; this debtor account will be allowed to be chosen as control account (appear as one of control accounts in Control Account field of this screen) for other debtors. This account will not carry any transaction/entries (just like Debtor Control Account), and it functions just like a parent account
Example: 300/0000 Debtor Control Account 300/GABB General Trading Berhad (marked as Group Company, control account is 300/0000) 300/GAB1 General Marketing S/B (control account is 300/GABB) 300/GAB2 General Production S/B (control account is 300/GABB) 300/N00A Normal debtor account A (not marked as Group Company, control account is 300/0000) 300/N00B Normal debtor account B (not marked as Group Company, contro account is 300/0000) Invoices will be billed to sub-accounts respectively, you may view statement of separate sub-accounts and the Group account (look into More Options); the Group account will appear as parent account in Balance Sheet Group company is not the same as branch maintenance (which only shows different delivery addresses) |
4. Is Active: means this debtor is allowed for transaction
5. Debtor Account: you may key in the account number for this debtor; OR click on ‘+’ button to auto generate debtor number; the format of debtor account number is set at Tools > Options > General > Account Code Format
6. Billing & Delivery Address: key in the address for billing/delivery purpose
7. Area: assig the area for report filtering purpose. Area Code is maintained at General Maintenance > Area Maintnance
8. Email Address: key in email address (will be used in Debtor Statement. Send batch mail attach with PDF file)
9. Attention: key in the name of the person to be addressed
10. Business Nature: key in the nature of business of this debtor
11. Agent: assign sales agent for report filtering purpose. Sales agent is maintained at General Maintenance > Sales Agent Maintenance
12. Currency: assign currency (if Multi Currency module is enabled). Currency code is maintained at General Maintenance > Currency Maintenance
13. Statement Type: choose either Open Item (each of the outstanding transactios will be displayed on statement report), Balance Forward (only the brought forward lump sum will be displayed according to report date), or No Statement (no statement will be issued to this customer)
If ‘Open Item’ is selected, you still may change to Balance Forward during billing transaction
14. Aging On: determine for the aging report either the outstanding amount will be shown in the month of its invoice date OR its due date. E.g. Invoice date is 01 July and the credit term is 30 days, for Aging On Invoice Date, the outstanding amount will appear in July’s aging; for Aging on Due Date, the outstanding amount will appear in August aging report (the month it was due)
15. Credit Term: assign credit term (for aging report purpose). Credit term is aintained at General Maintenance > Credit Term Maintenance
16. Credit Control: to set credit control policy whether to block, or suspend, or need passowrd when credit term and limit is violated.
Click on Credit Term, a window will appear:
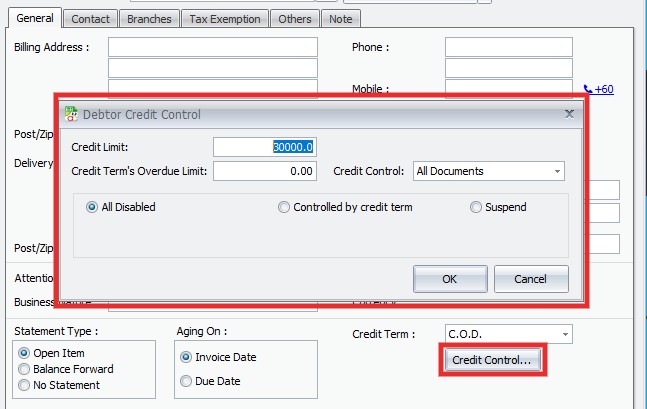
a) Credit Limit: key in a credit limit for control purpose
b) Credit Term’s Overdue Limit: key in the maximum amount of overdue (according to credit term) is allowed
c) Credit Control: to choose either to apply the same control on All Documents or different control on different documents (Quatation, Sales Order, Delivery Order, Invoice/Debit Note, Cash Sales)
d) All Disabled: means there will be no credit control
e) Controlled by credit term: to set control if this debtor exceeds credit limit or/and overdue limit
f) Suspend: to suspense this debtor, any further issuance of transaction documents will be suspended. You may key in the reason of suspension
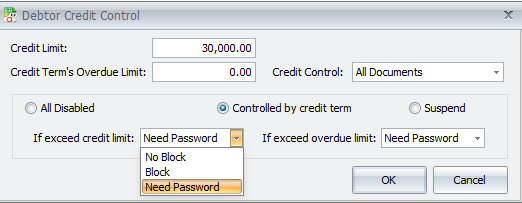
e1) If exceed credit limit/overdue limit:
- No Block: message will be prompted, but allows to proceed/save (allowed to exceed limit)
- Block: message will be prompted, do not allow transaction to be saved
- Need Password: message will be prompted, password of authorized user is needed
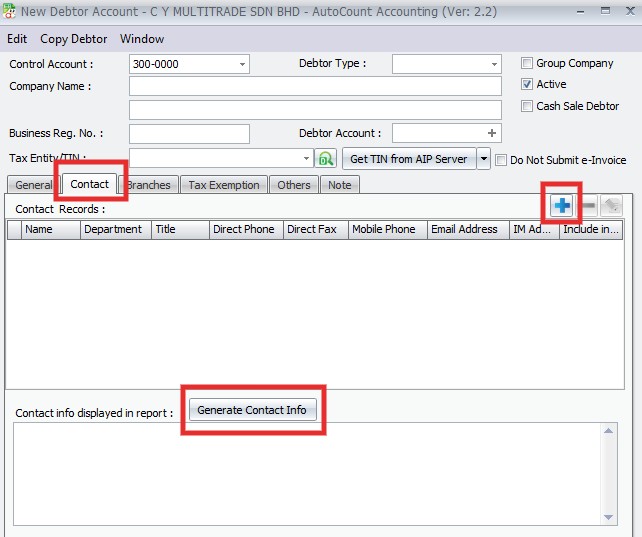
Contact Tab:
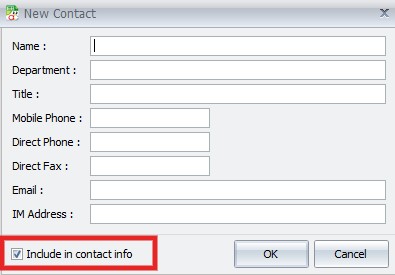
Include in contact info: to include these info into contact info, so that it can be attached onto report
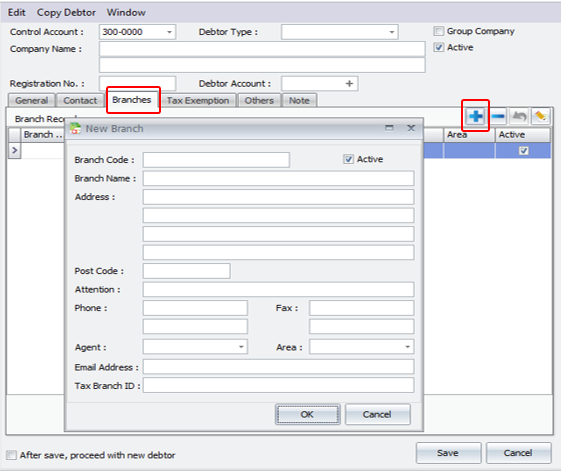
Branches Tab:
You may choose the branch during transaction thatinvolves branch delivery address (e.g. Delivery Order > More Header tab)
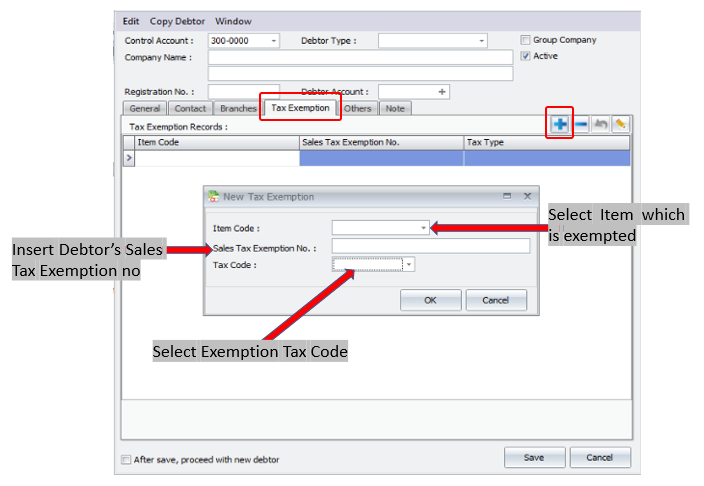
Tax Exemption Tab:
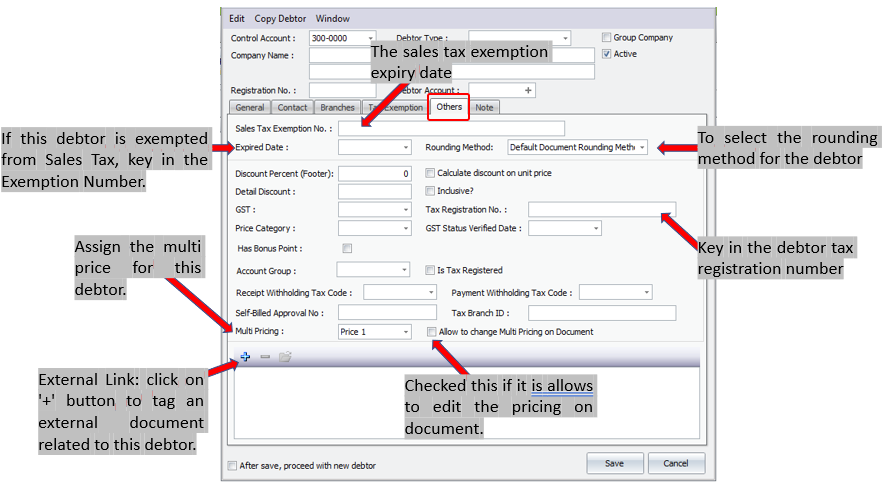
Others Tab:
Note Tab:
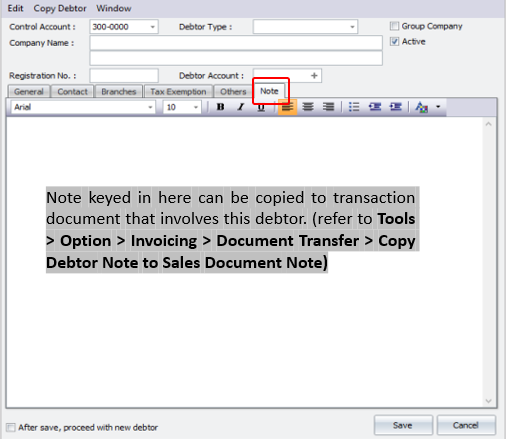
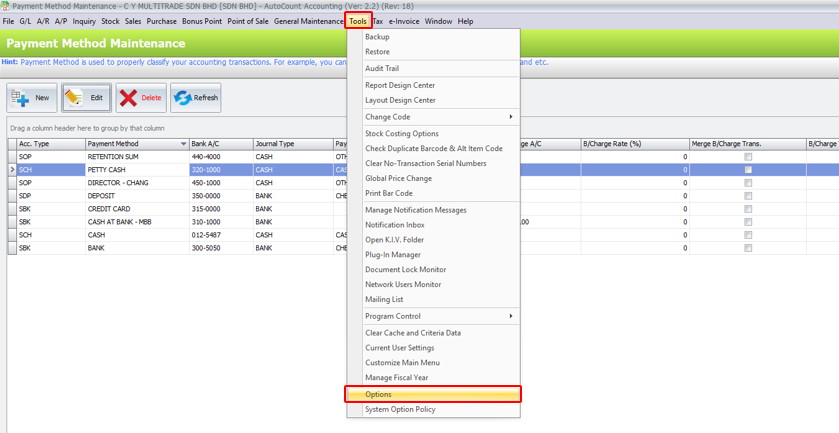
Go to Tools > Options
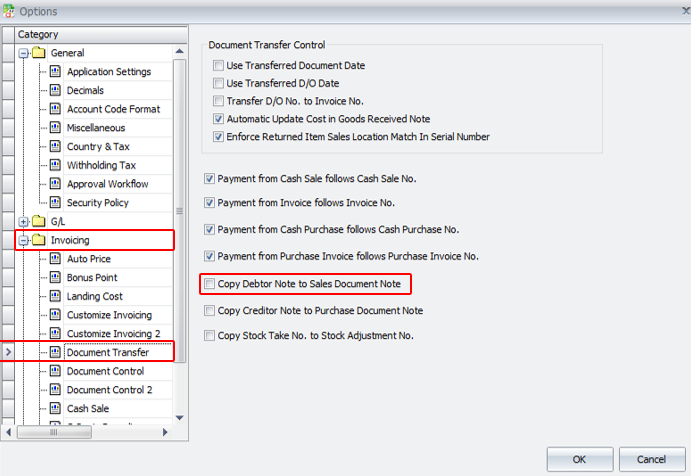
Select Invoicing > Document Transfer > Tick on the checkbox “Copy Debtor Note to Sales Document Note
8.2 Sales Invoice
i. Sales invoice is for create, edit or print Invoice
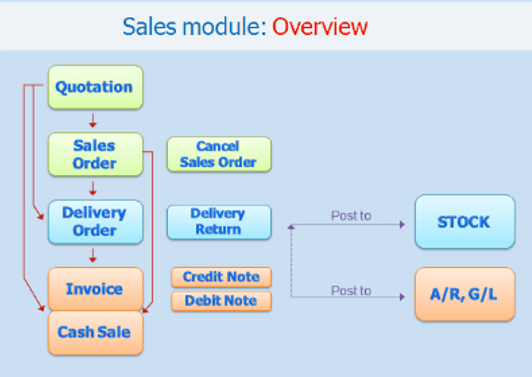
ii. Sales invoice will affect inventory movement (decrease Stock Level) if
- a) New Added-Key in but using Sales invoice (without transfer from other document)
- b) Transfer from Quotation
- c) Transfer from Sales Order
iii. Sales invoice will Not affect inventory movement (decrease Stock Level) if
- a) Transfer from Delivery Order (Stock Level decrease while created and saved Delivery Order)
- b) Sales Invoice will posted to A/R Invoice Entry upon Save
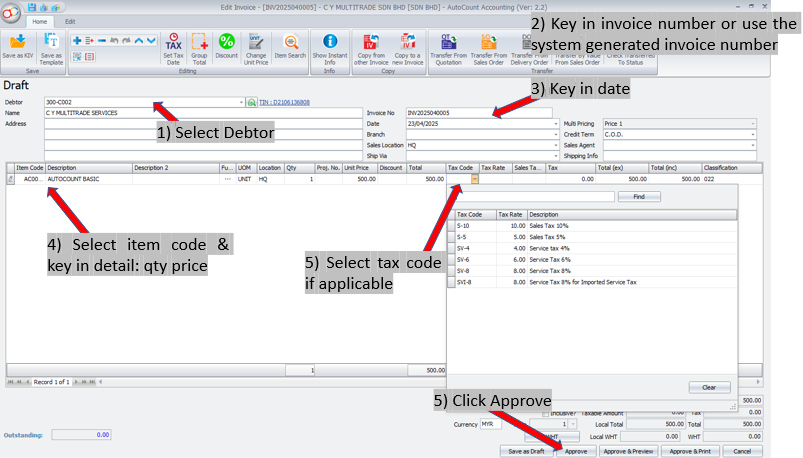
Debtor: will be displayed automatically (as per transferred document) |
| Branch: specify the branch of this debtor (if any) |
| Address: the info will be displayed according to selected debtor code. |
| Invoice No: <<New>> means to follow auto-running numbering (maintained at Document Numbering Format Maintenance), and the next possible number is displayed at the top bar of the window. You may click on it to key in any number you like. |
| Date: system date is automatically captured, you may click to change. |
| Branch: specify the branch of this debtor (if any) |
| Sales Agent: assign a sales agent (if any). The default Sales Agent can be assigned in Debtor Maintenance. |
| Ship Via: assign the shipping method (maintained at Shipping Method Maintenance) |
| Credit Terms: the default credit terms of this debtor will be displayed. |
| Shipping Info: key in the info of shipping or transportation. |
Details Column:
Item Code: click on ‘+’ sign to add a new row and select an item; you may key in the first few number/letters of the item code/description and select from the lookup screen. |
| Description: this is called detail description… will capture the item description automatically (amendable) |
| Further Description: click to view/edit Further Description of this item. (the default content can be maintained at Stock Item Maintenance) |
| Delivery Date: assign the expected delivery date (if needed) |
| UOM: the default unit of measurement will be captured; |
| Qty: key in the quantity. |
| Unit Price: the selling price will be captured (either Standard Selling Price or according to the setting in Tools > Options > Invoicing > Auto Price) |
| Discount: this is called column discount; you may key in the discount for any particular detail row. The discount could be a value (e.g. 5, 5.5, 10… ), a percentage (e.g. 5%, 5.5%, 10%), or a multi-level discount (e.g. 5+5.5, 5+5%, 5%+5%, 10%+5, 5%+5%+10, …. ) |
| Total: this is the line total (net) |
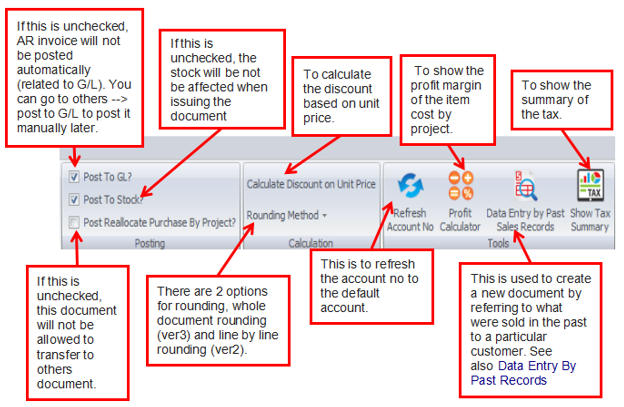
SST Code: to show the SST code. SST Rate: to show the rate of SST SST: to show the amount of SST. |
Total (ex): to show the subtotal before tax. Total (inc): to show the subtotal after tax. Subtotal (ex): to show the net total amount before tax. |
Proceed new invoice: when this is checked, a fresh screen will be ready for new document upon Save; if unchecked will exit the transaction screen upon Save. |
Funtional Buttons:
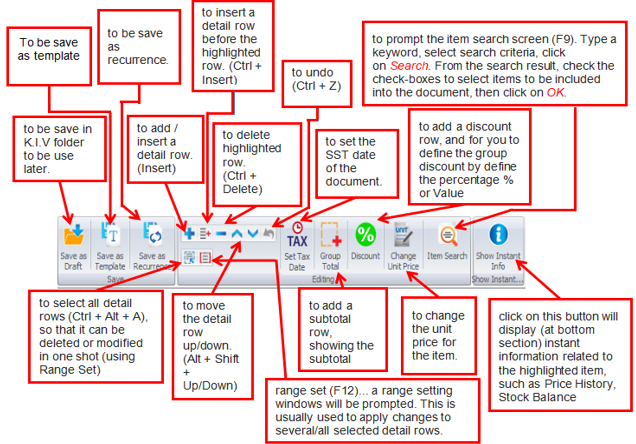
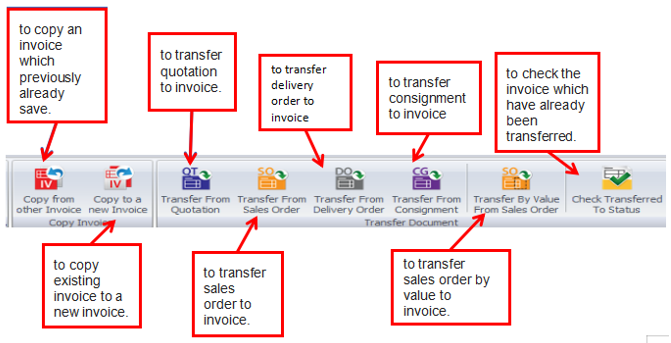
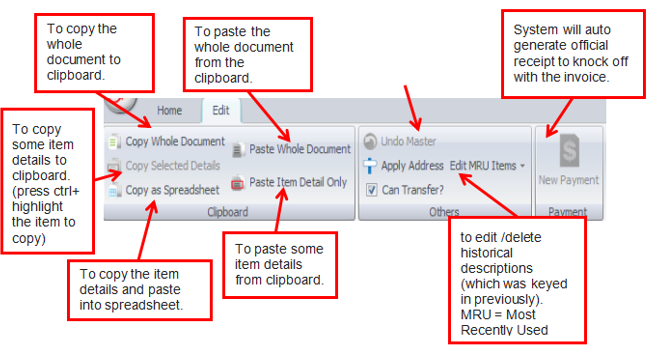
Edit Tab:
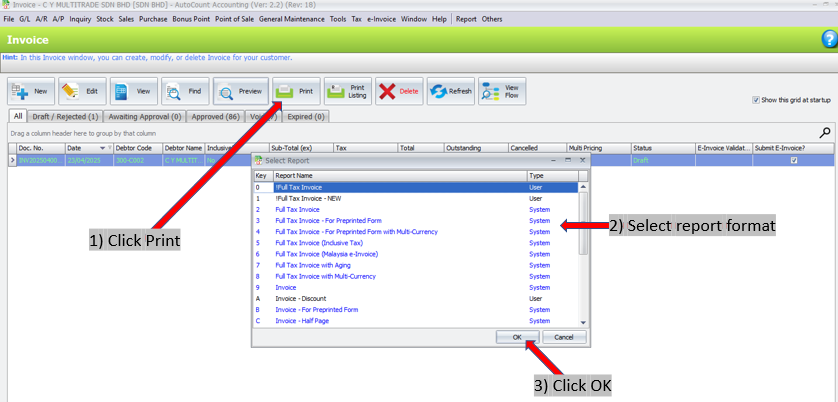
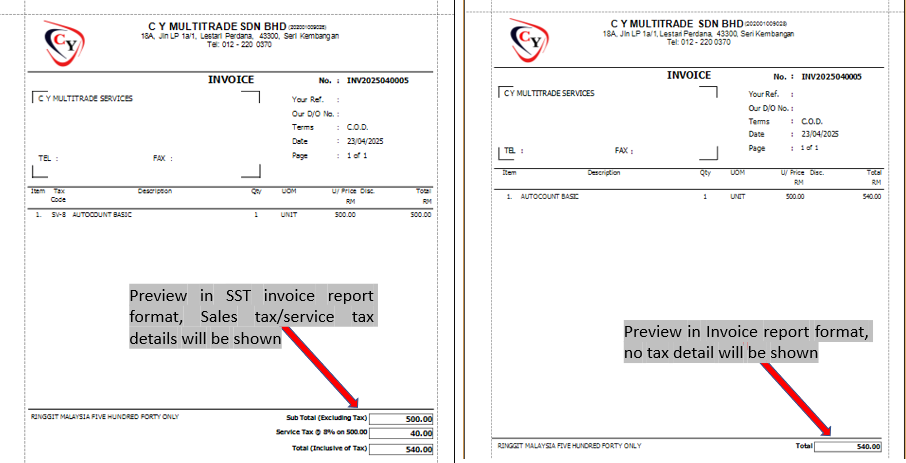
How to Print e-Invoice?
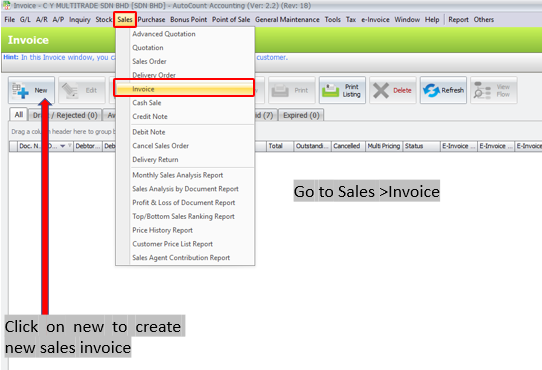
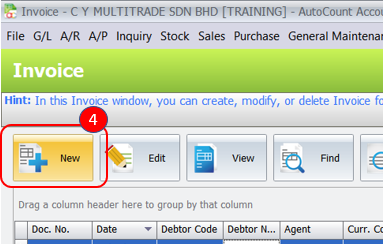
Go to Sales > Invoice
8.2.1 Merge Item During Transfer
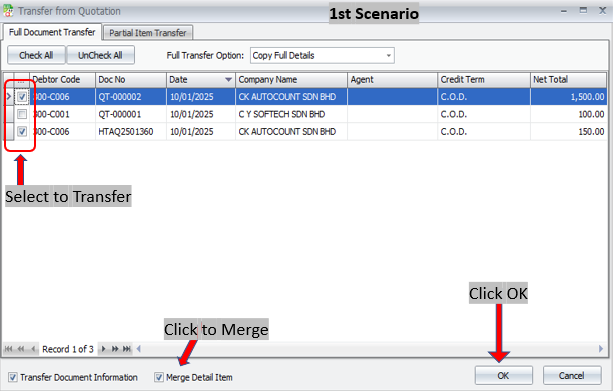
This guide demonstrate function of merging stock item during transfer when you partially/fully transferred from more than one (1) documents.
This guide will use 2 scenario:
1. Merge Detail Item
2. Untick Merge Detail Item 
Scenario 1:
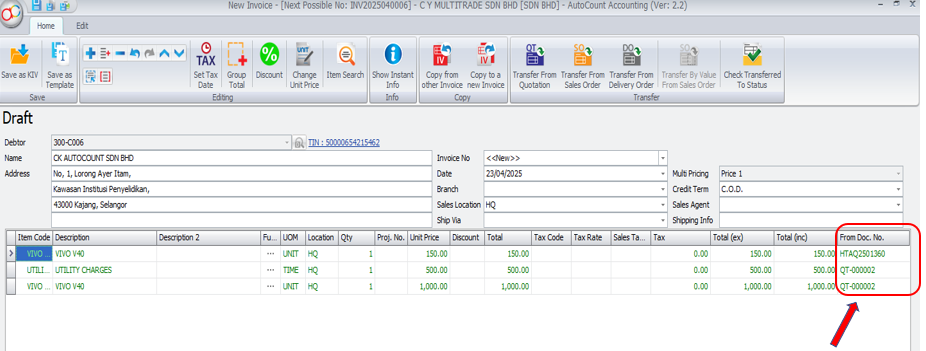
Scenario 2:
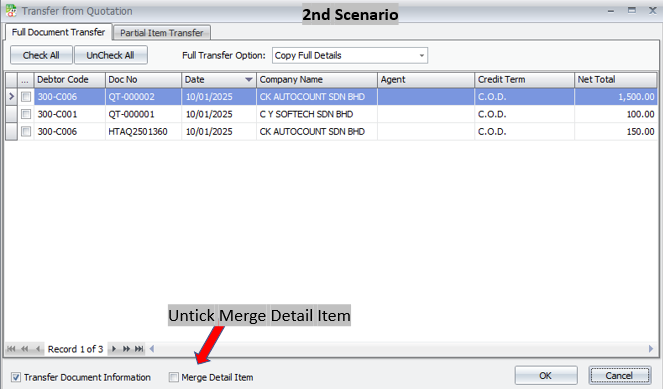
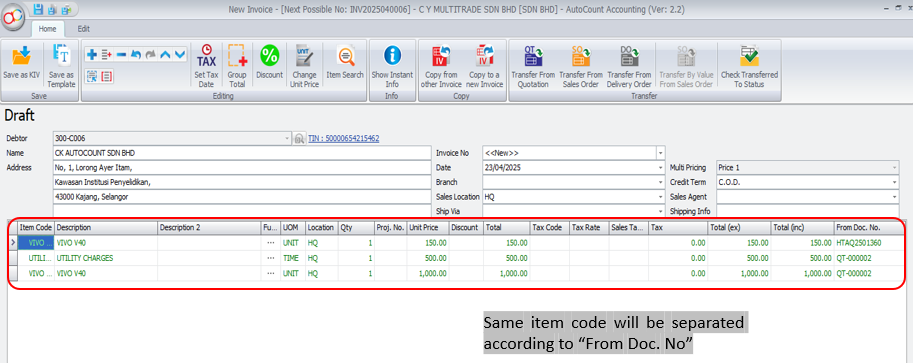
8.2.2 Redesigned of Transaction Interface
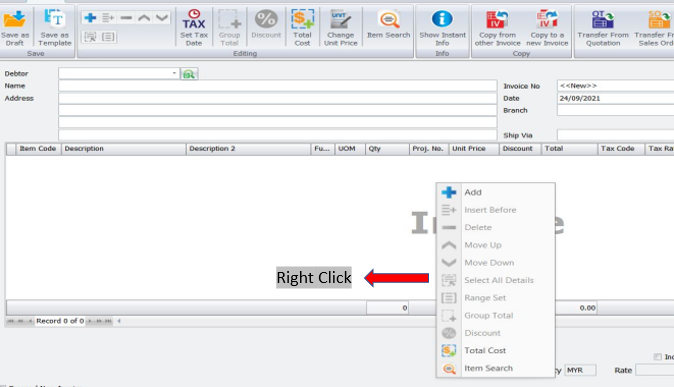
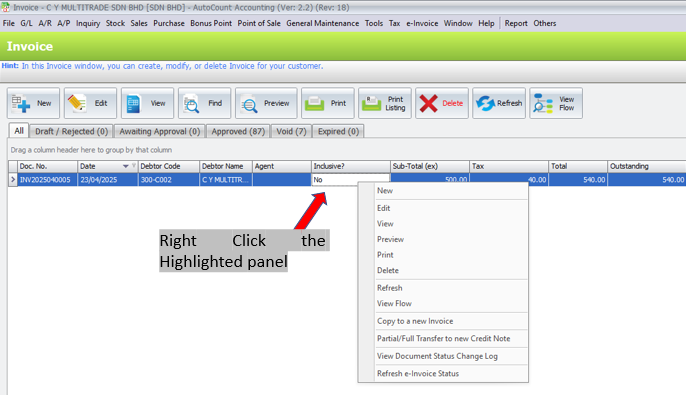
- Button Design
- Detail item shortcut
- Document Flow Shortcut(Sales & Purchase)
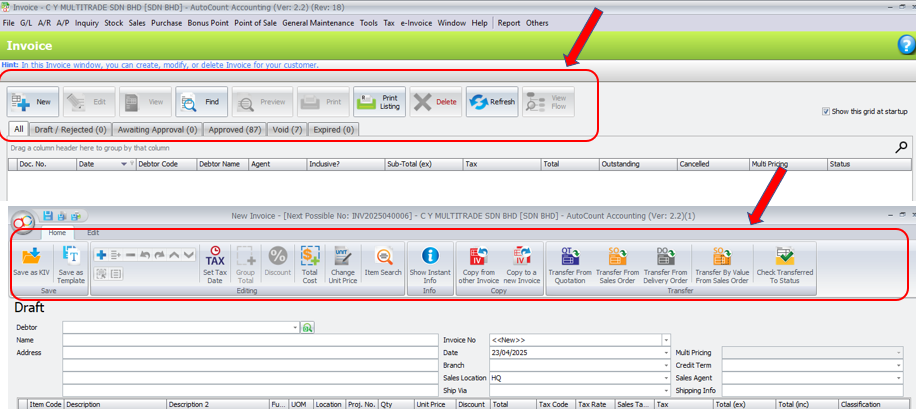
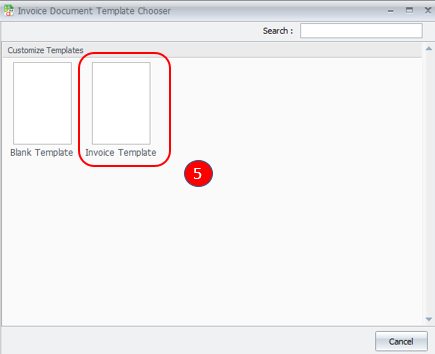
8.2.3 Template
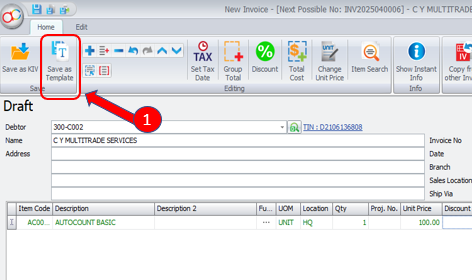
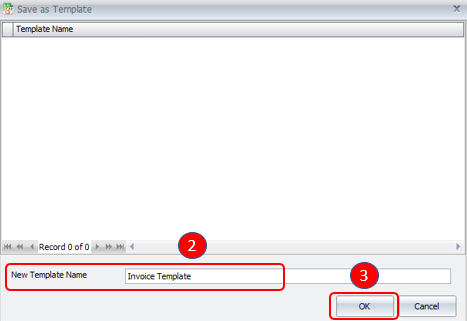
- Template is a new function in AutoCount Accounting 2.0, available for GL / Sales / Purchase.
- Template allows user to preset data in such as Debtor/Creditor, Items, Qty, Acc. No etc. in the entry and load it the next time without needing to re-key in everything again.
- This will save a lot of time and reduce human errors. User just need to load the template and edit the template.
8.2.4 WhatsApp Feature
AutoCount Accounting now support WhatsApp feature. User can now send their orders, invoices, reports etc through WhatsApp where the recipients can download the soft copy format into their own working devices.
This function can be accessed by user upon previewing their records or reports, at the top menu section.
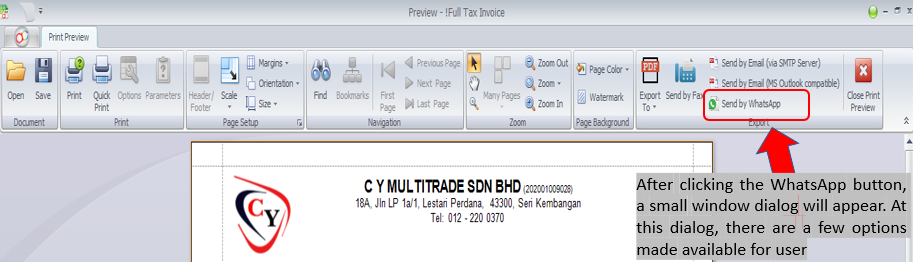
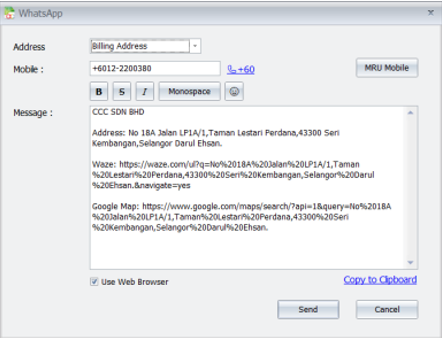
File Format: Select the file format to send to the recipents. (Currently only support PDF)
Mobile: Key in the mobile number of the recipents. For Sales and Purchase transactions, the mobile number will default capture from Debtor and Creditor Maintenance’s mobile field. (New field in this version).
Message: Any message that user wish to pass to the recipents together with attachment. A default message had been generated based on Document Number, Date, Amount and Company Name.
Use Web Browser: To send attachment and message through Web Browser WhatsApp, if untick, will send through WhatsApp application installed in user’s PC. *The attachment will be removed after 30 days.
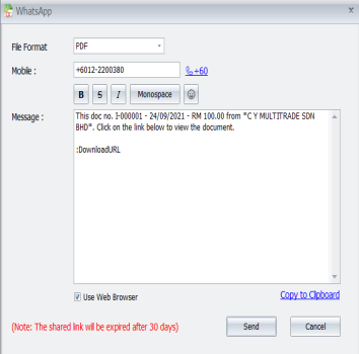
After selecting and filling required information, user can click on the “Send” button to send the soft copy to the recipients.
The recipents can click on the link provided to download the attached soft copy.
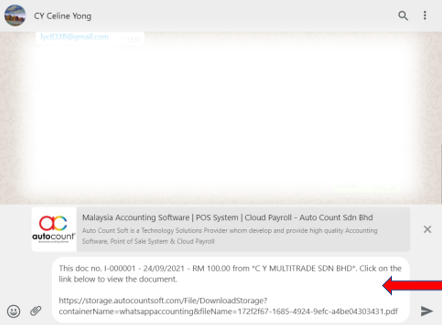
This WhatsApp feature is available for all reports that able to preview. Besides sending attachment document, user also able to send Map Location. User can access this when view entry and click on the “WhatsApp” icon
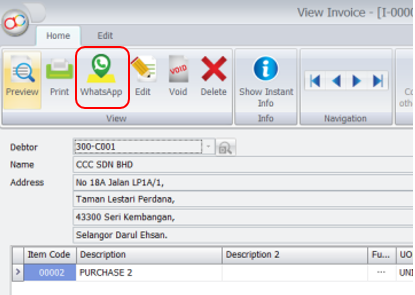
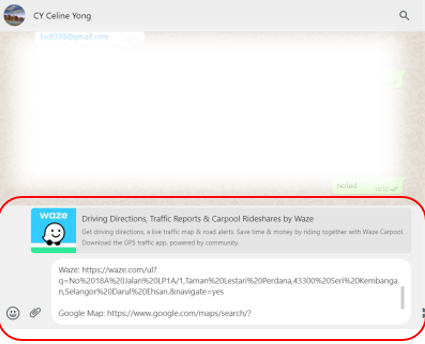
It will then prompt a similar dialog with difference of allowing user to choose Billing or Delivery Address. This Billing or Delivery Address is captured from the transaction address fields and it will generate the message accordingly to link against Waze and Google Map.
8.2.5 SMTP Email
- What user had been using before this version is the “Send by Email (MS Outlook compatible)” button (Previously known as Send by Email) which requires the PC to have an email application like Outlook installed to work.
- The new “Send by Email (via SMTP Server)” works in another way where it does not require the PC to have any email application installed. This provides an additional option in sending documents via email.
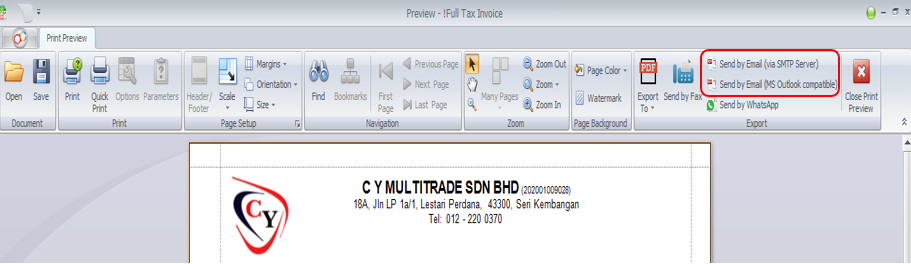
After clicking “Send by Email (via SMTP Server)” button, a dialog with some email related info will appear. User can modify the information such as recipients’ email, CC / BCC recipients, Subjects, Message and Attachments. In this new design, user can add any additional attachments into the email if require.
Just click on the “Add’ button and browse the file that wish to attach or remove any attachment by highlighting any attachment and click on the “Delete” button
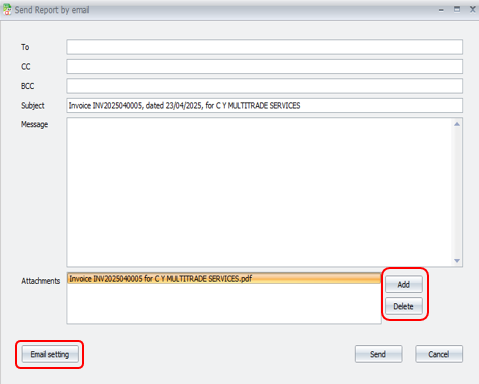
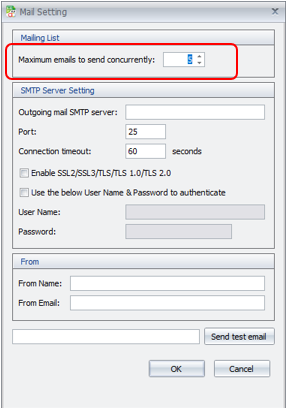
There is a “Email Setting” button which allows user to setup their mailing server setting, comes with a new “Maximum emails to send concurrently”. This function allows user to set the maximum of email to be processed concurrently at the same time. This function is more related to Batch Email Debtor Statement where user can set how many different emails is to be processed at the same time. Since Batch Email Debtor Statement might send out multiple emails.
For example, 20 emails from Debtor Statement, so if the number indicated for this Maximum email to send concurrently is set to 5, only 5 emails will be processed at the same time, the 6th email will only process after the 1st email is done processing, until it finishes processing all the emails.
However, it is not encouraged to set a high number for this as it will consume your PC RAM usage if there are many emails being processed at the same time.
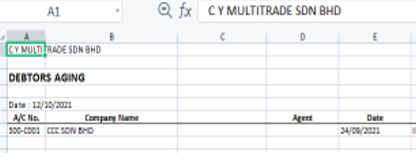
8.3 Export to Excel at Debtor and Creditor Aging
A new function had been added at Debtor and Creditor Aging Report. Go to Debtor Aging or Creditor Aging Menu → Export → Export to Excel
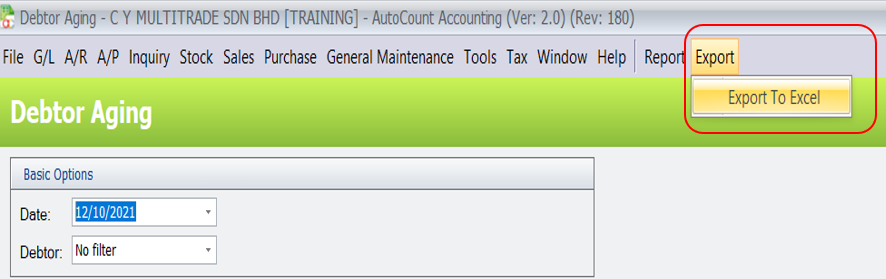
This function is basically to export aging results into Excel format in an organized format. User can now use this function to export instead of Previewing the aging with a Report Format and Export from there. This function had already been pre-set with some basic information that is required and it is easily editable after Exporting to Excel comparing to previous Export from Report Format.
8.4 A/R Invoice Entry
This is to create, edit or view A/R Invoice Entry.
A/R Invoice Entry is different from Sales Invoice though they are both involving debtors:
- A/R Invoice Entry is an Accounting entry (no bill printing); while Sales Invoice is a billing document (Invoice can be printed)
- A/R Invoice Entry (upon save) will automatically update the related G/L accounts; Sales Invoice (upon save) will post automatically (depends on option setting) the entries to A/R Invoice Entry and update the related G/L accounts.
- A/R Invoice Entry is mainly used when you are not using Invoicing system;
- You are not allowed to edit A/R Invoice Entry if it was posted from other source (Sales Invoice).
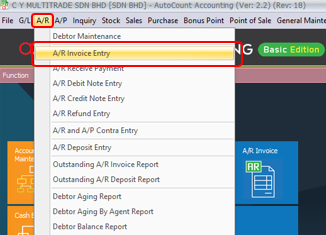
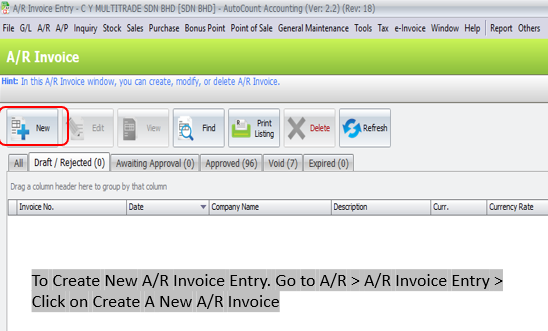
First, go to A/R > A/R Invoice Entry > Click New
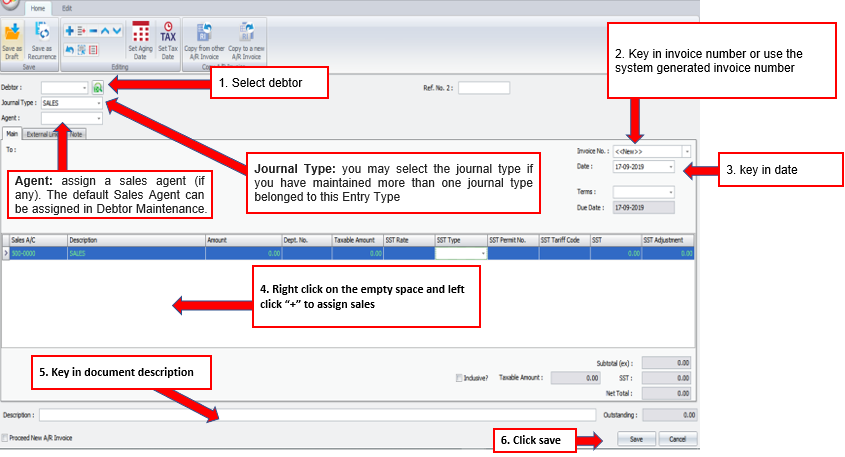
Debtor: key in the first number/alphabet, OR click on the drop down arrow button, OR click on Search button to assign/select a debtor number.
Journal Type: you may select the journal type if you have maintained more than one journal type belonged to this Entry Type (refer to Journal Type Maintenance)
Agent: assign a sales agent (if any). The default Sales Agent can be assigned in Debtor Maintenance.
Ref. No.2: key in other reference number if any.
Invoice No: <<New>> means to follow auto-running numbering (maintained at Document Numbering Format Maintenance), and the next possible number is displayed at the top bar of the window. You may click on it to key in any number you like.
Date: system date is automatically captured, you may click to change.
Terms: credit terms of this debtor.
Due Date: auto-calculated according to Date and Terms.
Details Column:
| Sales A/C: click on ‘+’ sign to add a new row and select the account number; you may key in the first few number/letters of the account number/description and select from the lookup screen. |
| Description: this is called detail description… will capture the account description automatically (amendable) |
| Amount: key in the invoice amount. (add several rows if you want to show itemised amounts.) |
SST Type: to show the SST code. SST Rate: to show the rate of SST. SST Permit No: to use in Singapore only. SST Tariff Code: Item Tariff Code Maintained at Tax>Tariff Maintenance SST: to show the amount of SST. SST Adjustment: to adjust the SST amount. SST: to show the total SST based on taxable amount. |
| Subtotal (ex): to show the net total amount before tax. |
| Net Total: to show the net total after tax. |
| Description: this is called document description…will remember from most recently keyed in description. |
| Outstanding: the outstanding amount of this Invoice. This value will change accordingly if payment/partial payment is made. |
| Proceed with new A/R Invoice: when this is checked, a fresh screen will be ready for new entries upon Save; if unchecked will exit the transaction screen upon Save. |
Functional Button:
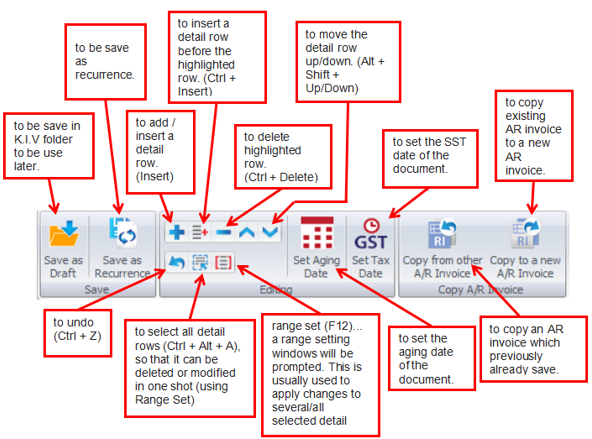
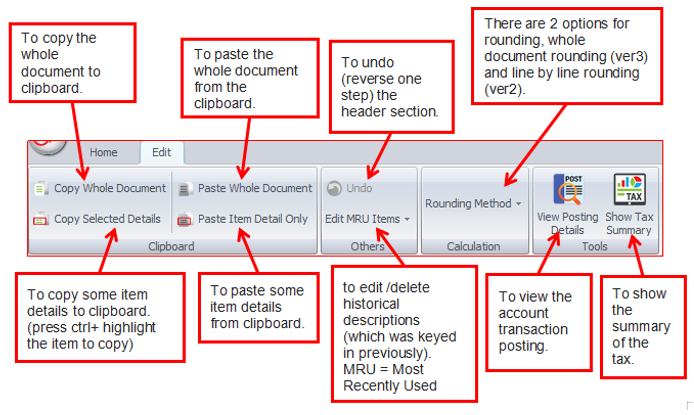
Edit Tab:
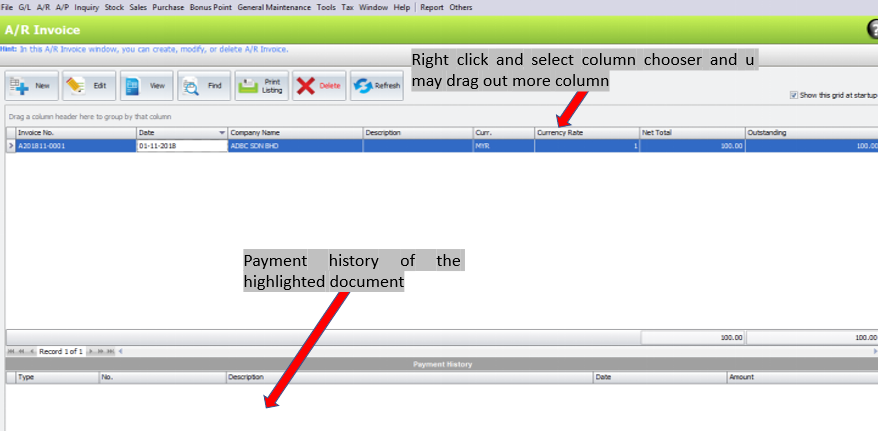
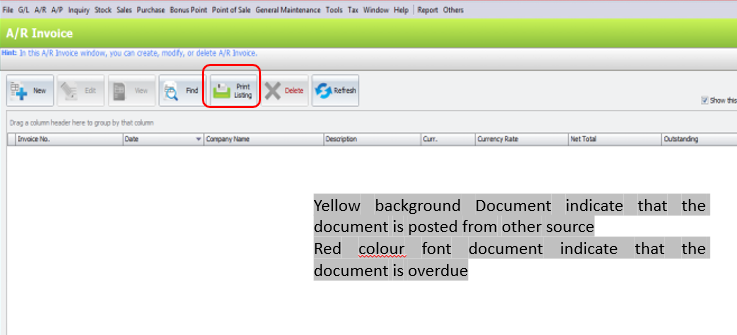
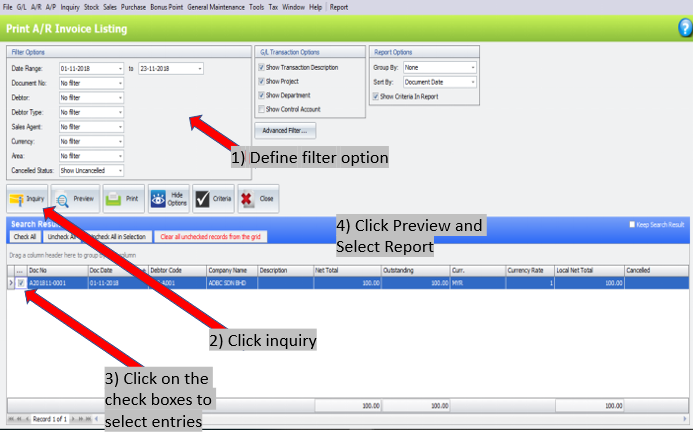
Step to print A/R Invoice Entry Listing
8.5 Credit Note
This is to create, edit or print sales credit note.
Sales Credit Note is used when there was a goods return (involved physical stock movement) or change in item price, other wise (if it involves only a change in total amount use A/R Credit Note Instead
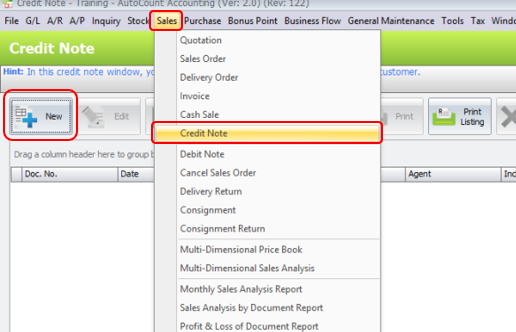
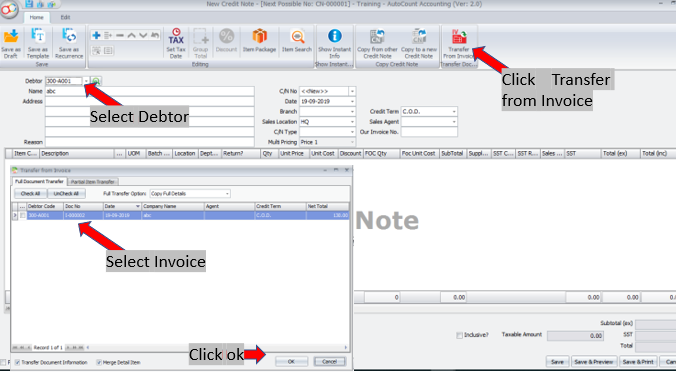
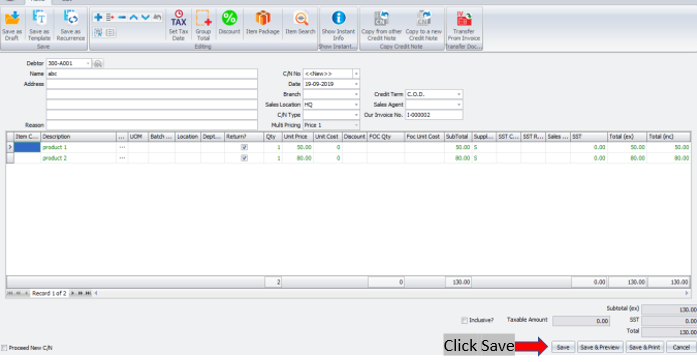
First, go to Sales > Credit Note > Click New
Funtional Buttons:
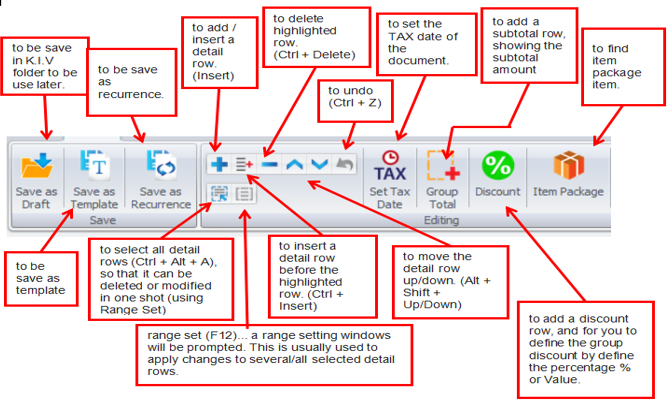
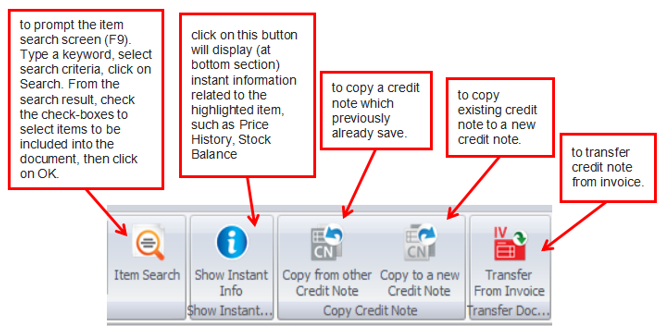
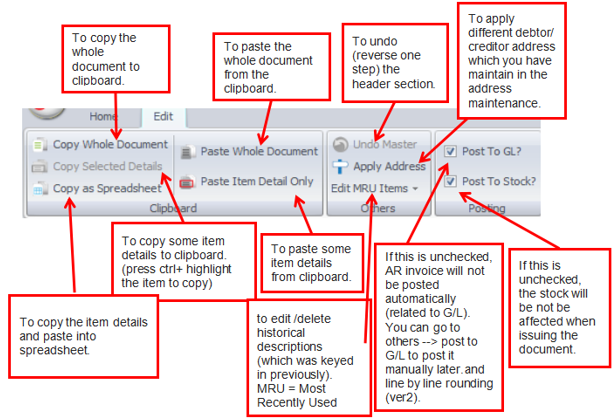
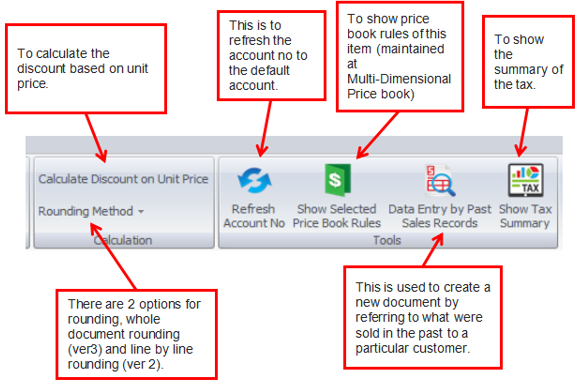
| Item Code: click on ‘+’ sign to add a new row and select an item; you may key in the first few number/letters of the item code/description and select from the lookup screen. |
| Description: this is called detail description… will capture the item description automatically (amendable) |
| Further Description: click to view/edit Further Description of this item. (the default content can be maintained at Stock Item Maintenance) |
| UOM: the default unit of measurement will be captured; |
| Qty: key in the quantity. |
| Unit Price: the selling price will be captured (either Standard Selling Price or according to the setting in Tools > Options > Invoicing > Auto Price) |
| Discount: this is called column discount; you may key in the discount for any particular detail row. The discount could be a value (e.g. 5, 5.5, 10… ), a percentage (e.g. 5%, 5.5%, 10%), or a multi-level discount (e.g. 5+5.5, 5+5%, 5%+5%, 10%+5, 5%+5%+10, …. ) |
| SubTotal: this is the line total (net) |
SST Code: to show the SST code. SST Rate: to show the rate of SST SST: to show the amount of SST. |
Total (ex): to show the subtotal before tax. Total (inc): to show the subtotal after tax. Subtotal (ex): to show the net total amount before tax. |
| Proceed new C/N: when this is checked, a fresh screen will be ready for new document upon Save; if unchecked will exit the transaction screen upon Save. |
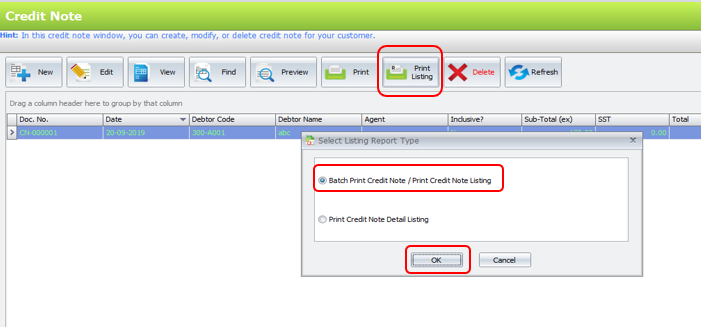
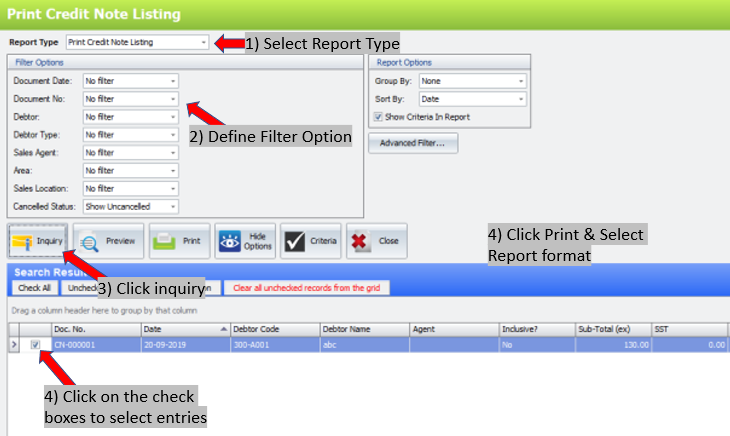
Step to print Credit Note Listing
8.6 A/R Credit Note
This is to create, edit, or view A/R Credit Note Entry. A/R Credit Note Entry is also use to knock-off A/R Invoice and/or A/R Debit Note.
A/R Credit Note Entry is different from Sales Credit Note though they are both involving debtors:
- A/R Credit Note Entry (upon save) will automatically update the related G/L accounts; Sale Credit Note (upon save) will post automatically (depends on option setting) the entries to A/R Credit Note Entry and update the related G/L accounts.
- You are not allowed to edit A/R Credit Note Entry if it was posted from other source (Sales Credit Note).
Credit Note is also used when debtor A’s debt is to paid by B, in this case a CN will be created for A and a DN for B.
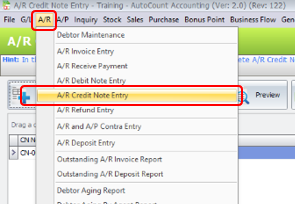
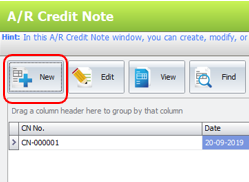
To Create New A/R Credit Note Entry, Go to A/R > A/R Credit Note Entry > New
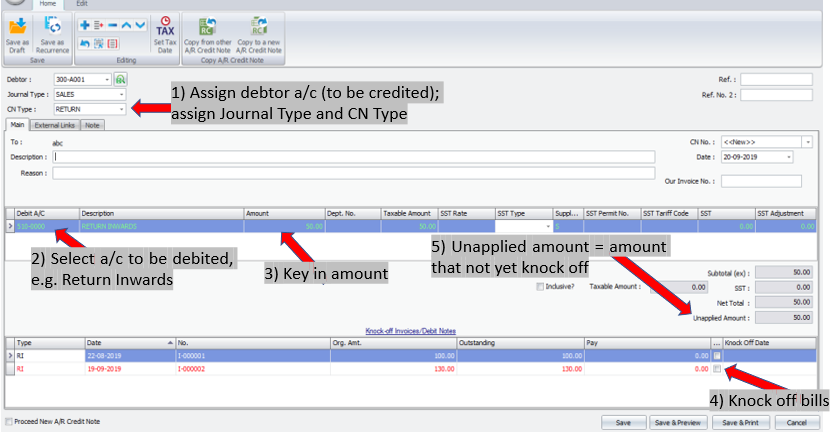
Debtor: key in the first number/alphabet, OR click on the drop down arrow button, OR click on Search button to assign/select a debtor number.
Journal Type: you may select the journal type if you have maintained more than one journal type belonged to this Entry Type (refer to Journal Type Maintenance)
CN Type: select the Credit Note type. Credit Note Type is maintained at C/N Type Maintenance.
Ref.: key in the reference number, e.g. Invoice No.
Ref. No.2: key in other reference number if any.
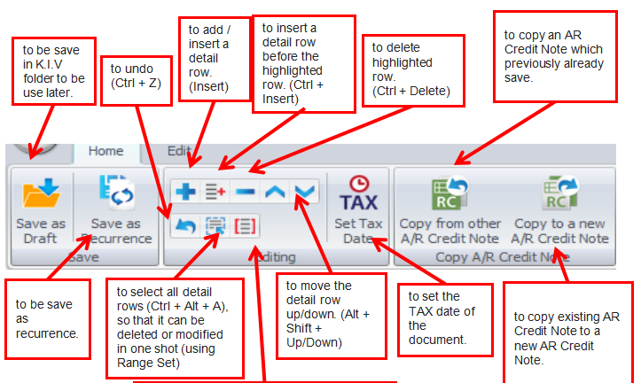
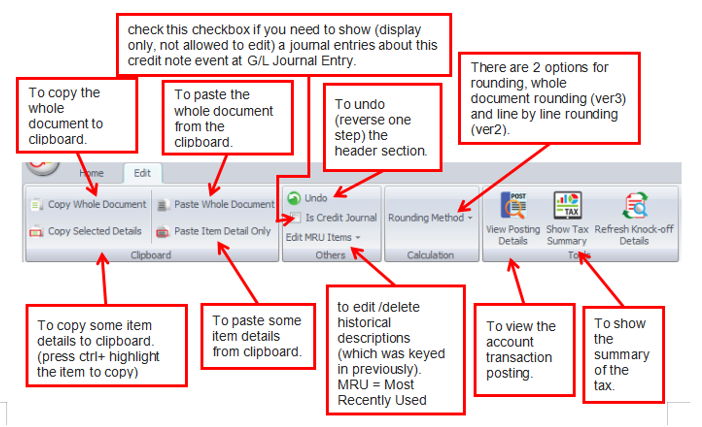
Functional Buttons:
Details Column:
Description: this is called document description…will remember from most recently keyed in description. |
| Reason: the reason of credit note being issued. |
| CN No: <<New>> means to follow auto-running numbering (maintained at Document Numbering Format Maintenance), and the next possible number is displayed at the top bar of the window. You may click on it to key in any number you like. |
| Date: system date is automatically captured, you may click to change. |
| Our Invoice No: to key in debtor invoice no or for your own reference. |
| Debit A/C: right click on ‘+’ sign to add a new row and select the account number; you may key in the first few number/letters of the account number/description and select from the lookup screen. |
| Description: this is called detail description… will capture the account description automatically (amendable) |
| Amount: key in the credit note amount. (add several rows if you want to show itemised amounts.) |
SST Type: to show the SST code. SST Rate: to show the rate of SST. SST: to show the amount of SST. SST Adjustment: to adjust the SST amount. SST: to show the total SST based on taxable amount. |
| Subtotal (ex): to show the net total amount before tax. |
| Net Total: indicates the total credit note amount of this entry. |
| Unapplied Amount: to show the credit note amount that has yet to knock off against Invoice/Debit Note. If there is any note been saved with unapplied amount, message will be prompted when adding new Credit Note Entry offering to open and use the previous unapplied amount. |
Knock Off Invoice / Debit Note Section:
Type: indicates the type of transaction; e.g. RI (A/R Invoice), RD (A/R Debit Note)… |
| Date: indicates date of Invoice or DN. |
| No.: indicates document number |
| Org. Amt.: indicates the original amount of the document before any knock off |
| Outstanding: indicates the amount of the document that yet to pay. |
| Pay: the knock off amount. Click on this column header to automatically fill in the knock off amount. |
| Knock Off Date: the date when the document being pay or knock off (the date must be equal or greater the document date) |
| Proceed New A/R Credit Note: when this is checked, a fresh screen will be ready for new entries upon Save; if unchecked will exit the transaction screen upon Save |
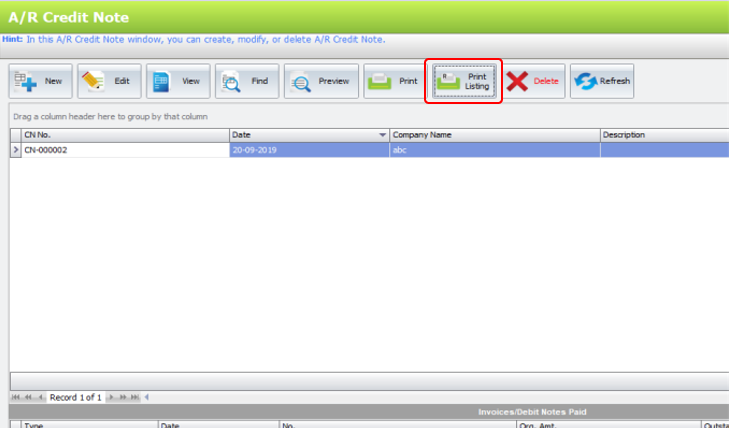
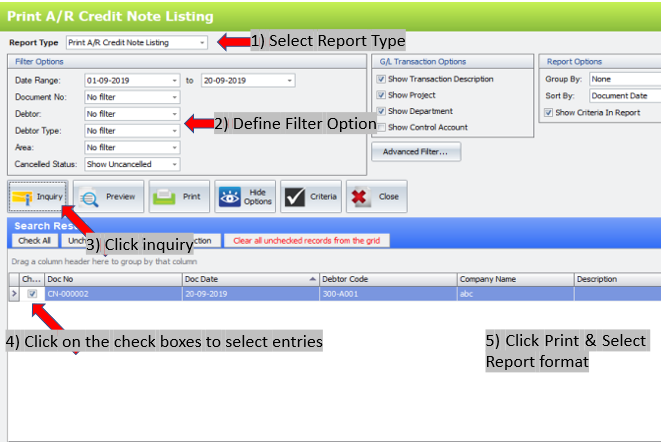
Print A/R Credit Note Listing:
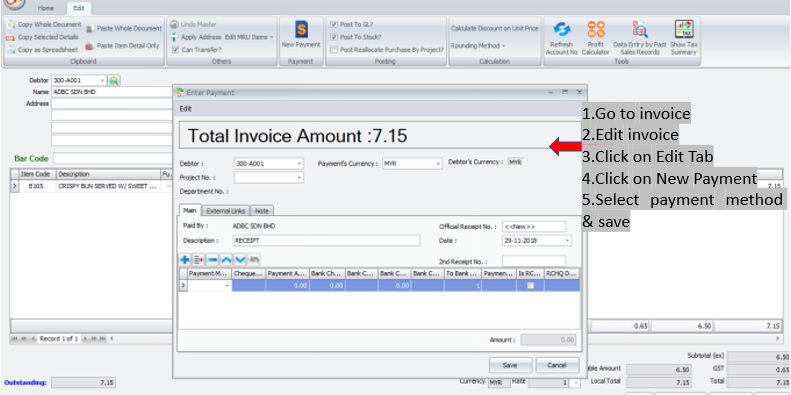
8.7 Payment for Sales Invoice
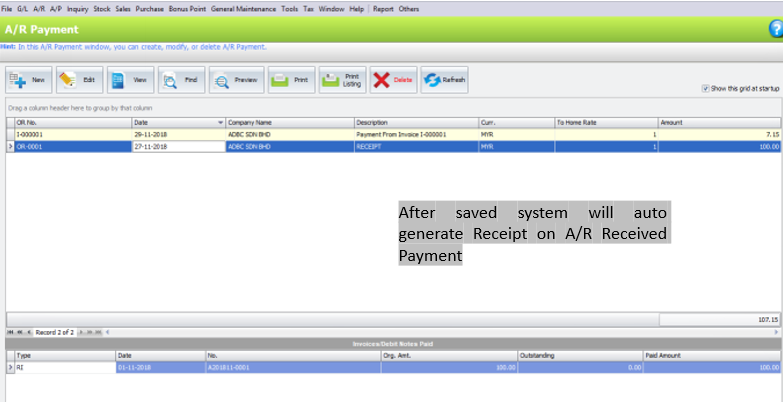
8.8 A/R Receive Payment
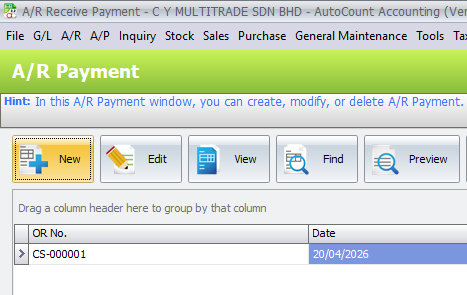
This is to record full/partial payment received from debtor, knock-off related invoice or Debit Note, and print Official Receipt
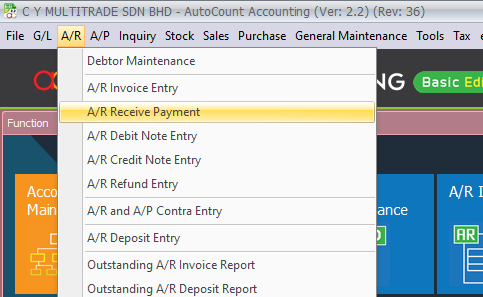
First, go to A/R > A/R Receive Payment > Click New
| Debtor: key in the first number/alphabet, OR click on the drop down arrow button, OR click on Search button to assign/select a debtor number. |
| Payment’s Currency: to make payment in different currency. |
| Description: this is called document description…will remember from most recently keyed in description. |
| Official Receipt No: <<New>> means to follow auto-running numbering (maintained at Document Numbering Format Maintenance), and the next possible number is displayed at the top bar of the window. You may click on it to key in any number you like. |
| Date: system date is automatically captured, you may click to change. |
| 2nd Receipt No: The DocNo2 column will be posted to Cash Book Entry’s 2nd Voucher No. (for your own reference) |
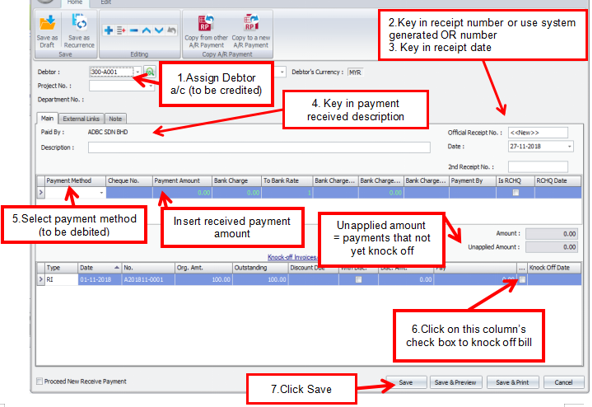
DetailsColumn:
| Payment Method: select a payment method. Click on ‘+’ sign to add a new row for multiple payment method. |
| Cheque No.: key in cheque number if any. |
| Payment Amount: key in the payment amount by this payment method. |
Bank Charge: key in bank charge value if any. Bank Charge Tax Code: to maintain bank charges tax code Bank Charge Tax: the amount of SST for bank charges |
| Payment By: key in the mode of payment. |
Is RCHQ: this used when a cheque payment made earlier is returned/bounced (use Edit mode). RCHQ Date: define the date when the cheque is returned/bounced. |
| Amount: indicates the total payment amount of this entry. |
| Unapplied Amount: to show the payment amount that has yet to knock off against Invoice/Debit Note. If there is any payment been saved with unapplied amount, message will be prompted when adding new Receive Payment offering to open and use the previous unapplied amount. |
Knock Off Invoices / Debit NoteSection:
| Type: indicates the type of transaction; e.g. RI (A/R Invoice), RD (A/R Debit Note)… |
| Date: indicates date of Invoice or DN. |
| No.: indicates document number |
| Org.Amt.: indicates the original amount of the document before any knock off |
| Outstanding: indicates the amount of the document that yet to pay. |
| Discount Due: indicates the due date for early payment discount (refer to Credit Term Maintenance) |
| With Disc.: to indicate the document is entitled for discount; check to key in discount amount; CN will be generated. |
| Disc. Amt.: to key in the discount amount (or auto-calculated based on early payment discount); the Outstanding amount will reduce accordingly. |
| Pay: the knock off amount. Click on this column header to automatically fill in the knock off amount. |
| Knock Off Date: the date when the document being pay or knock off (the date must be equal or greater the document date) |
| Proceed New Receive Payment: when this is checked, a fresh screen will be ready for new entries upon Save; if unchecked will exit the transaction screen upon Save |
Functional Button:
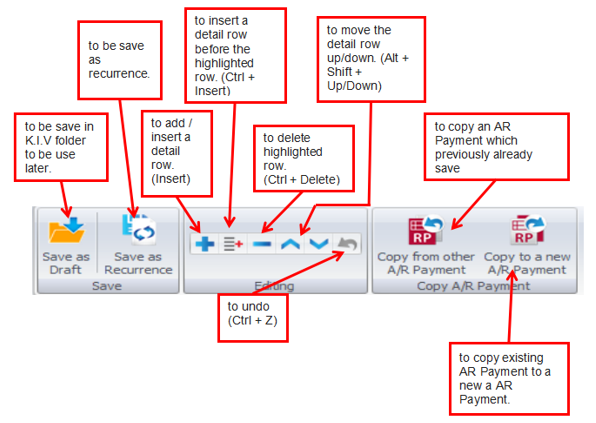
Edit Buttons:
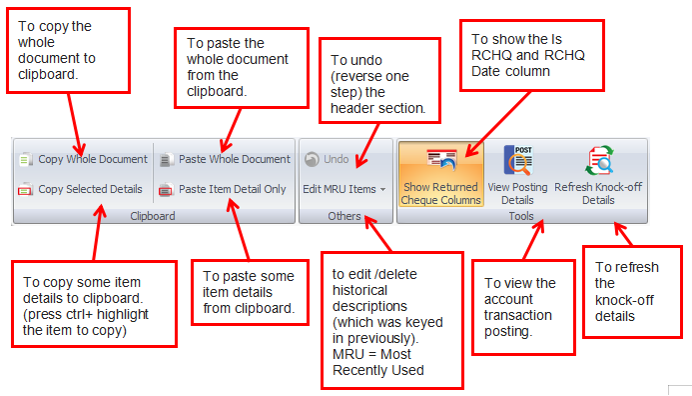
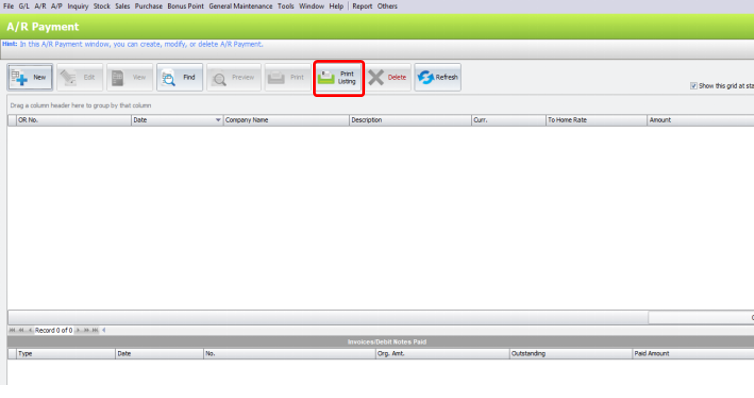
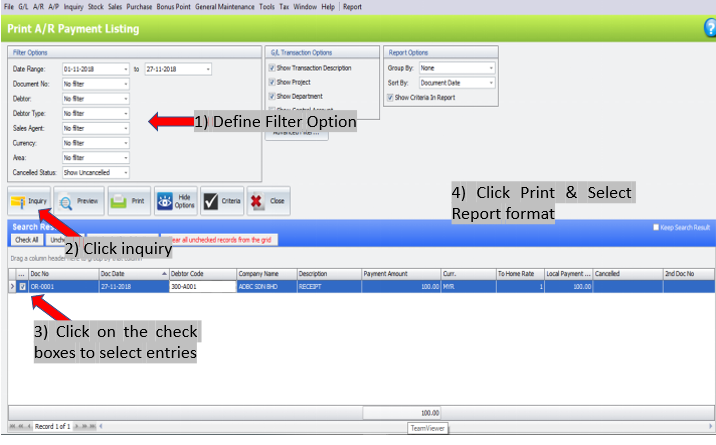
Print A/R Received Payment Listing:
8.9 A/R Deposit Forfeited & Refund
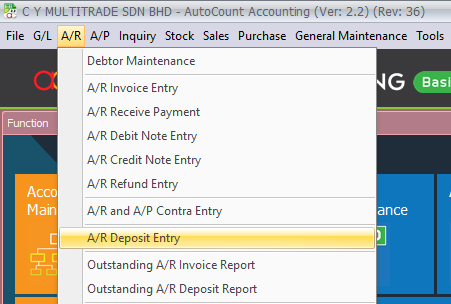
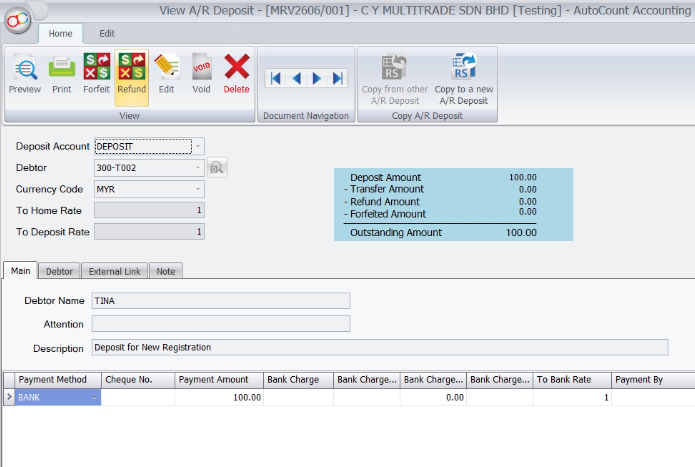
Go to A/R > A/R Deposit Entry
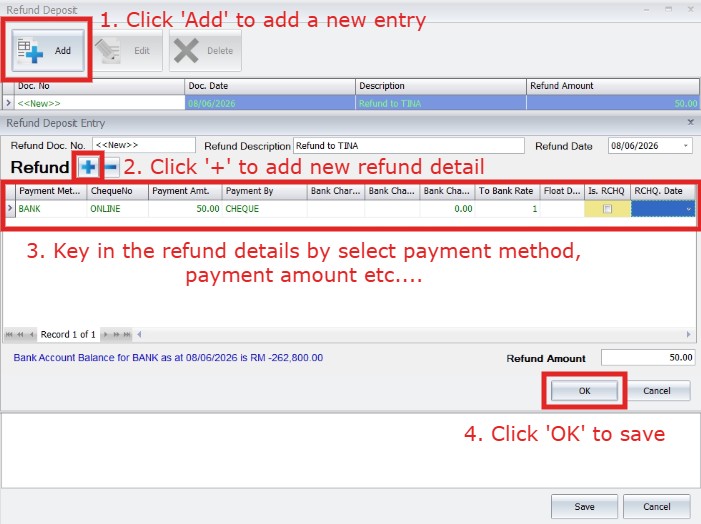
A/R Deposit Refund
Select the Deposit Entry wish to do Refund, then click View
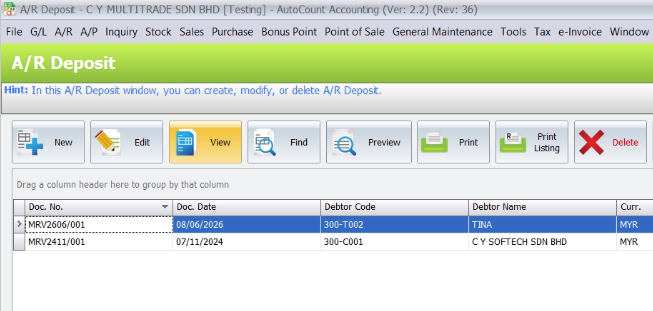
Click on the “Refund” button
A/R Deposit Forfeited
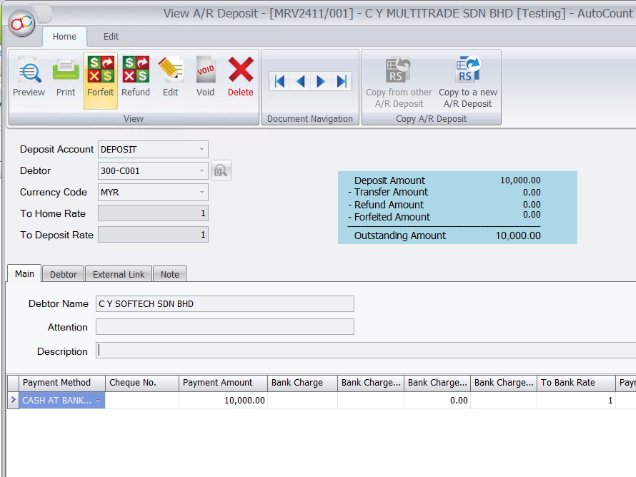
Select a Deposit Entry that you wish to do Forfeit, then click on ‘View’
Click on the ‘Forfeit’ button
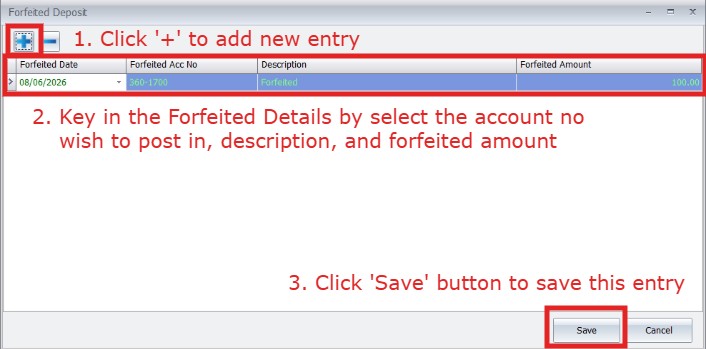
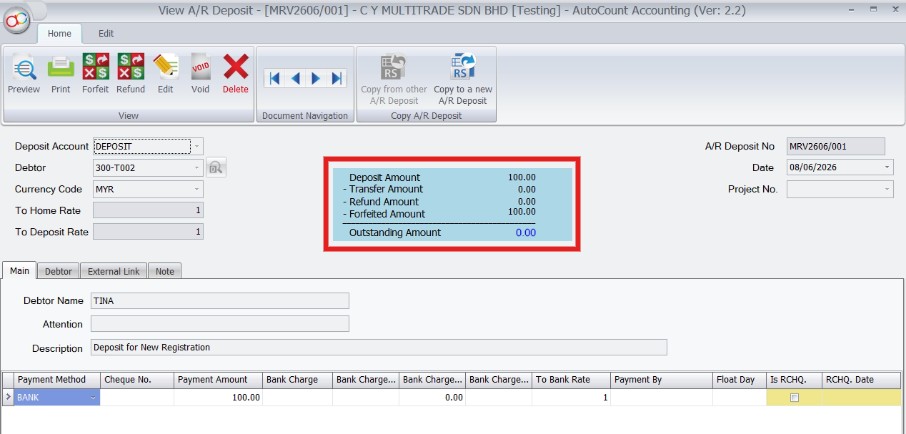
Summary of the forfeited amount can be show at here