Chapter 7 Purchase & AP Module
7.1 Creditor Maintenance
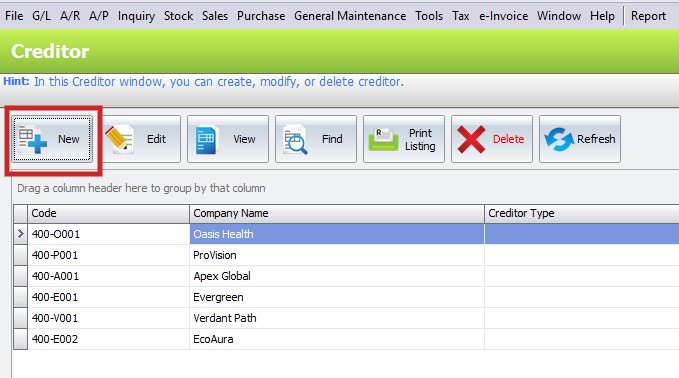
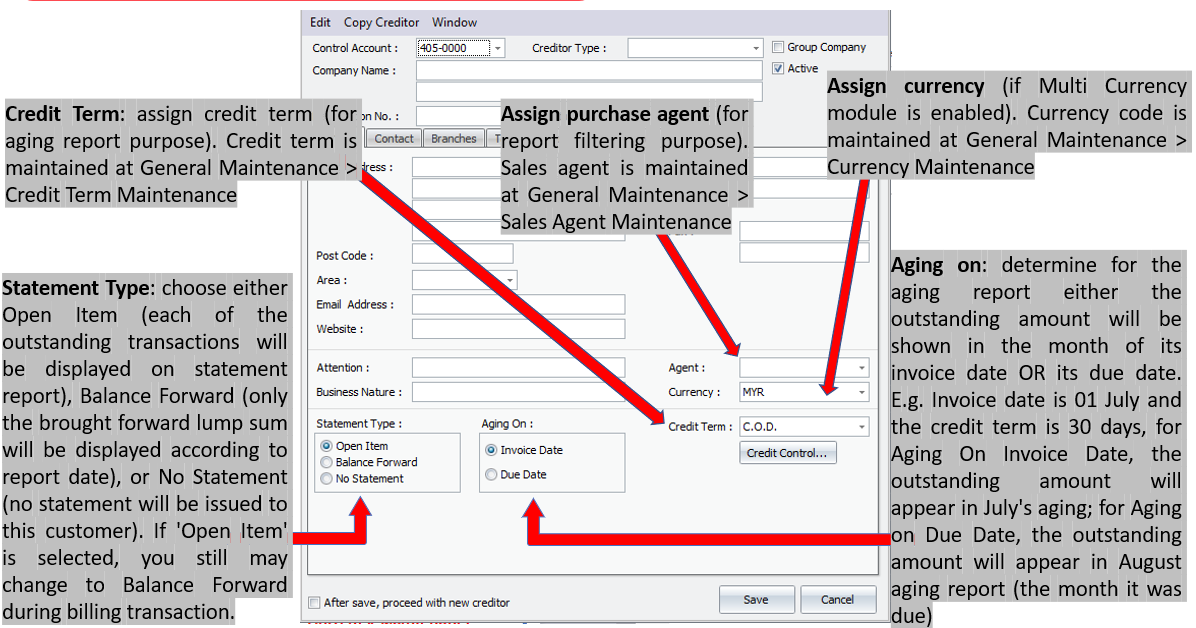
First, go to A/P > Creditor Maintenance

Click on New
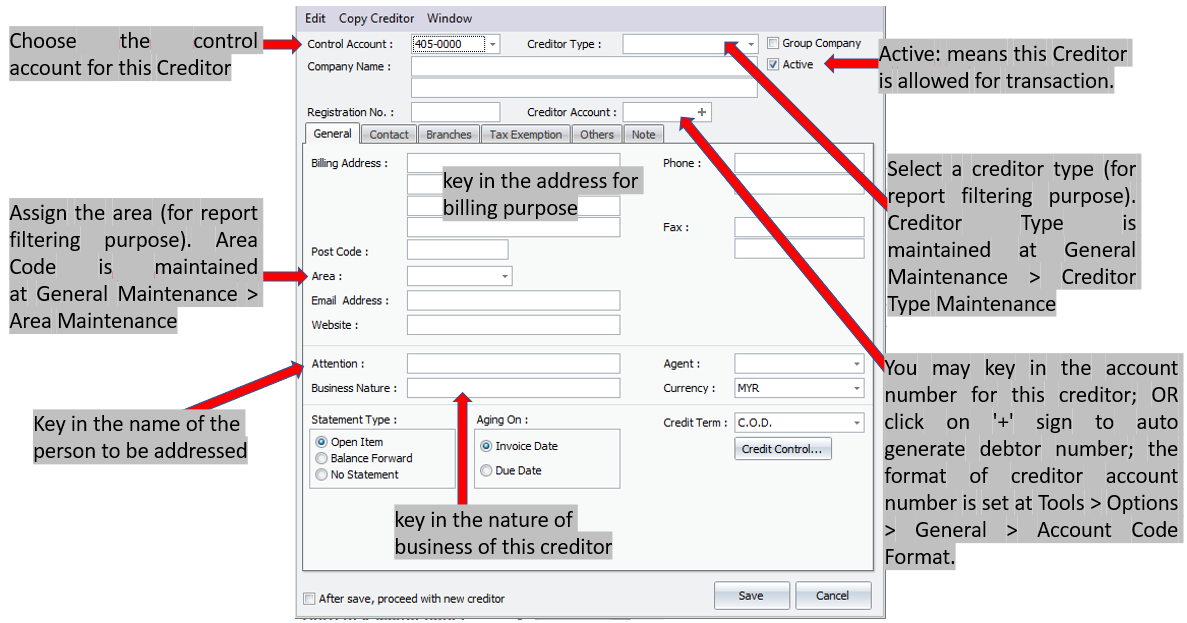
Group Company: if this is checked, it means this creditor account is the control account of a group company; this creditor account will be allowed to be chosen as control account (appear as one of control accounts in Control Account field of this screen) for other creditors. This account will not carry any transaction/entries (just like Creditor Control account), and it functions just like a parent account.
Example: 400/0000 Creditor Control Account
400/GABB General Trading Berhad (marked as Group Company, control account is 400/0000)
400/GAB1 General Marketing S/B (control account is 400/GABB)
400/GAB2 General Production S/B (control account is 400/GABB)
400/N00A Normal creditor account A (not marked as Group Company, control account is 400/0000)
400/N00B Normal creditor account B (not marked as Group Company, control account is 400/0000)
Purchases will be made to the sub-accounts respectively, you may view statement of separate sub-accounts and the Group account (look into More Options); the Group account will appear as parent account in Balance Sheet. Group company is not the same as branch maintenance.
Purchases will be made to the sub-accounts respectively, you may view statement of separate sub-accounts and the Group account (look into More Options); the Group account will appear as parent account in Balance Sheet. Group company is not the same as branch maintenance.
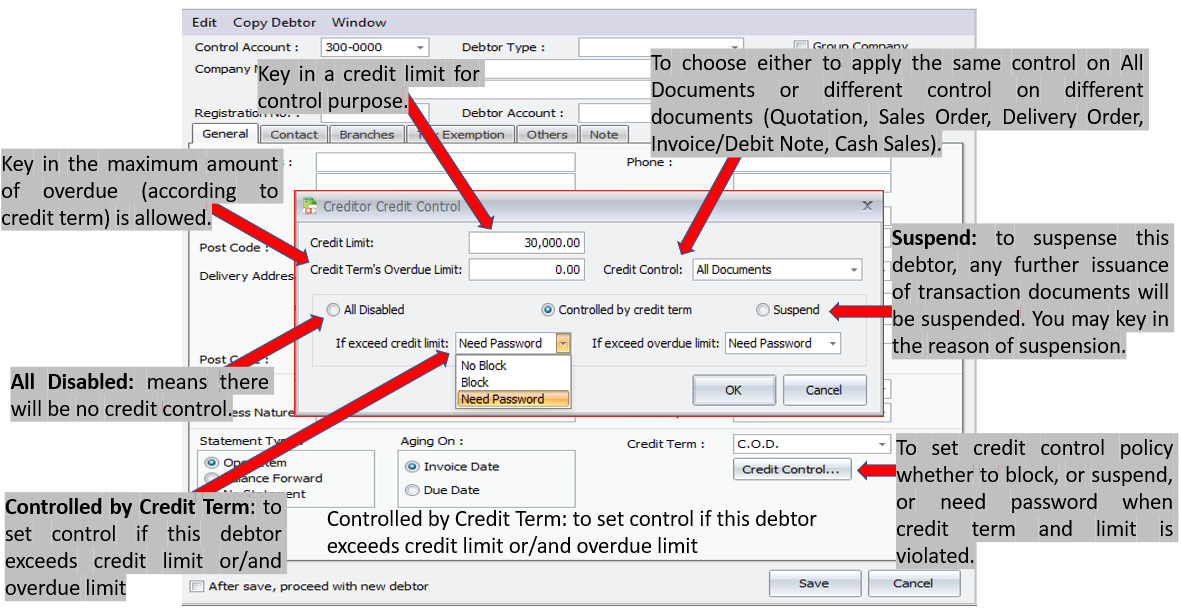
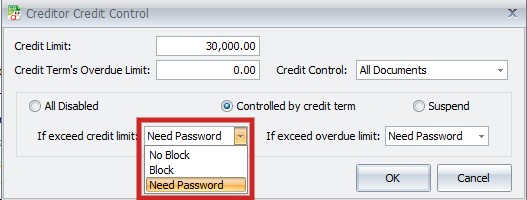
1. No Block: message will be prompted, but allows to proceed/save (allowed to exceed limit)
2. Block: message wil be prompted, do not allow transaction to be saved
3. Need Password: message will be prompted, password of authorized user is needed
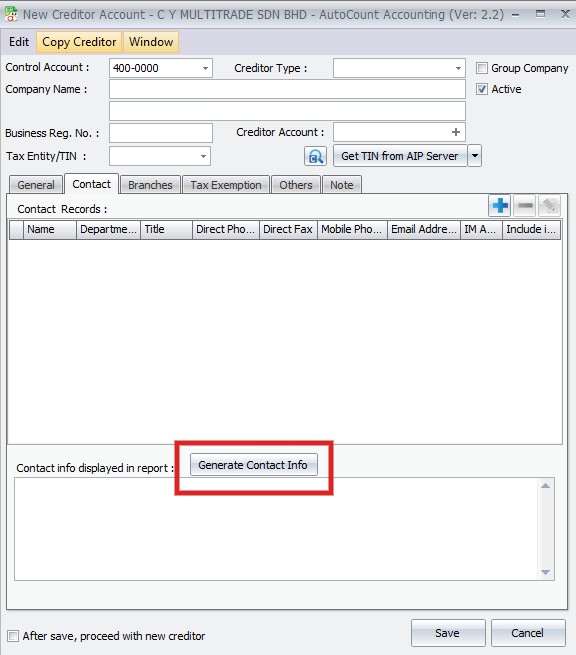
Click on Contact > click ‘+’ button to add new
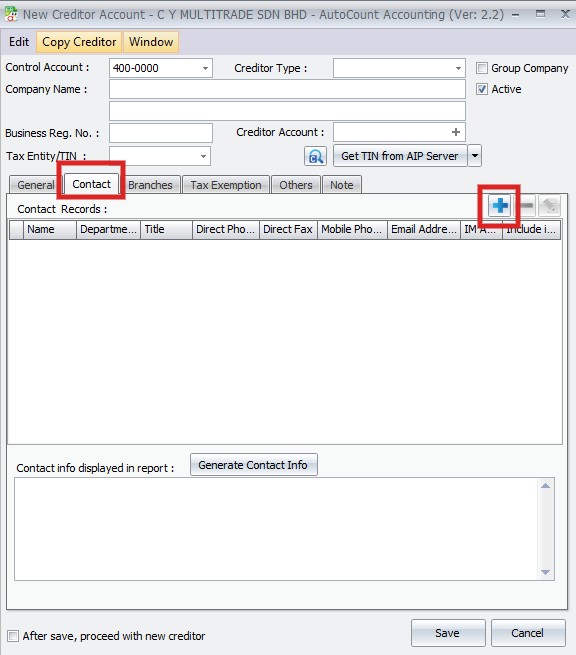
Include in contact info: to include these info into Contact Info, so that it can be attached onto report
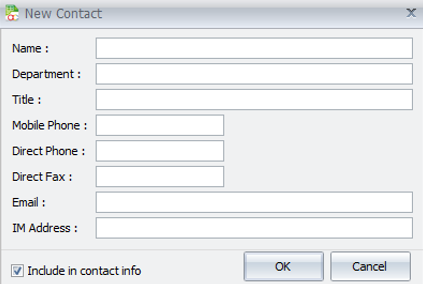
Generate Contact Info: to generate from Contact Info
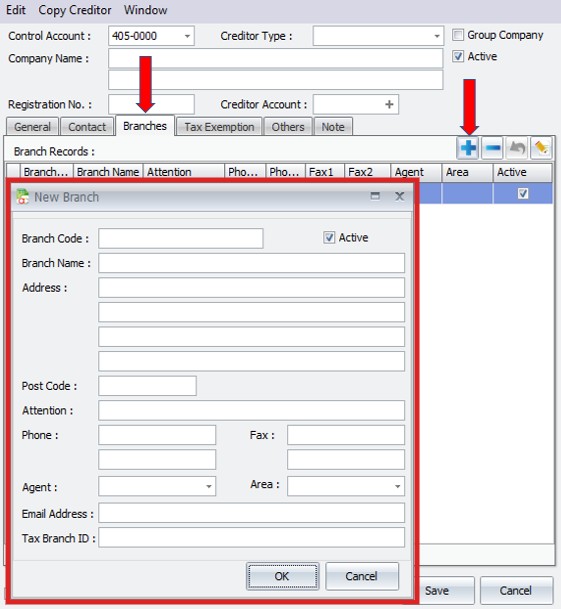
Click on Branches > ‘+’ button to add new branch
Key in the address, and other into…
You may choose the branch during transaction that involves branch details
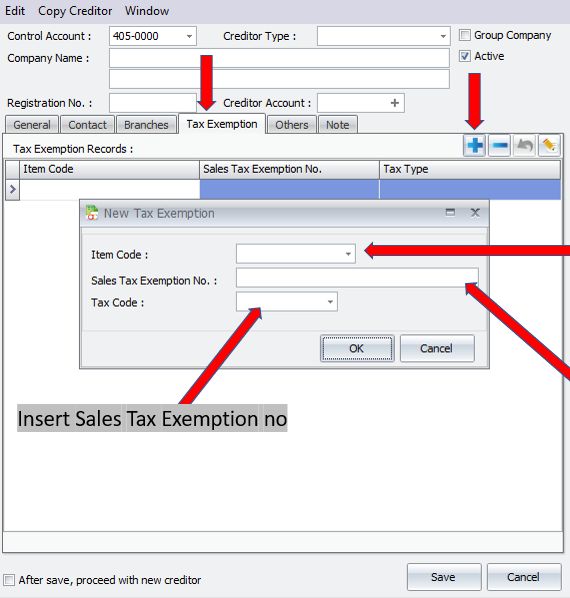
Click on Tax Exemption > ‘+’ button
Item Code: select item which is exempted
Sales Tax Exemption No.: select exemption tax code
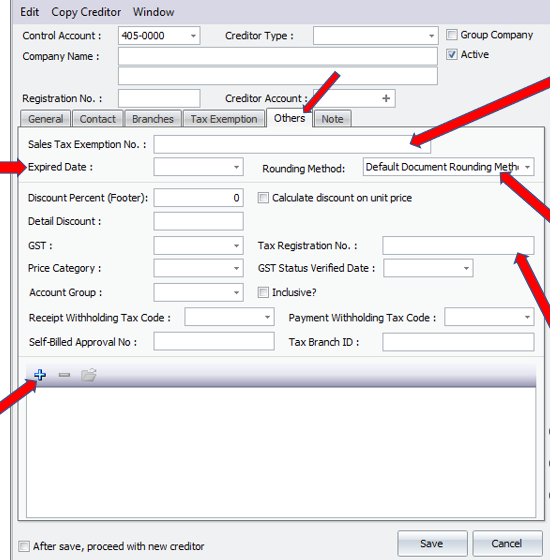
Click Others tab
1. Sales Tax Exemption No.: if this creditor is exempted from Sales Tax, key in the Exemption Number
2. Expired Date: the sales tax exemption expiry date
3. Rounding Method: to select the rounding method for the debtor
4. Tax Registration No.: Key in the creditor tax registration number
5. External Link ‘+’: click on ‘+’ button to tag an external document related to this creditor

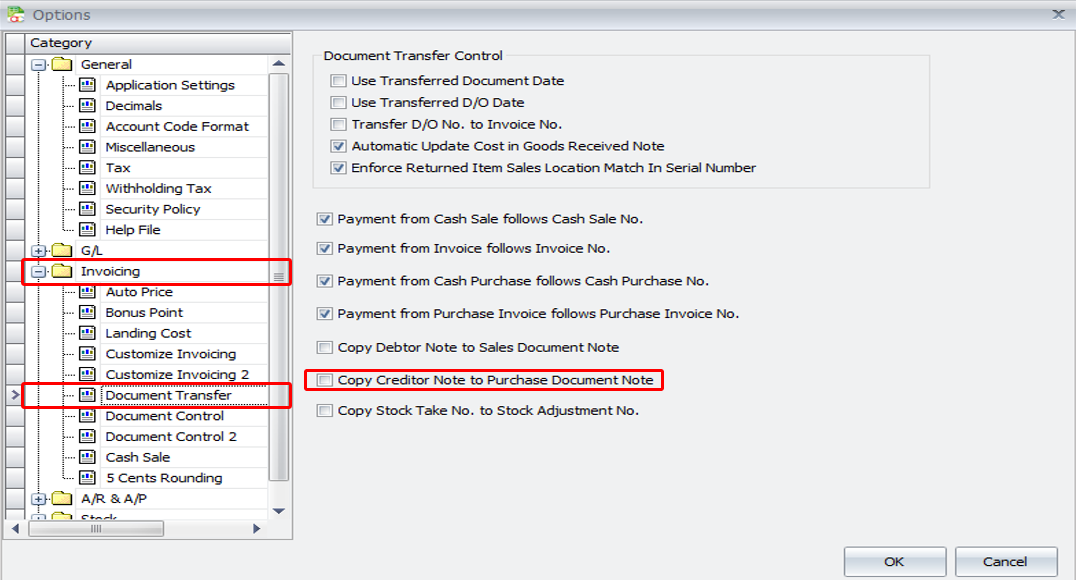
Go to Tools > Options
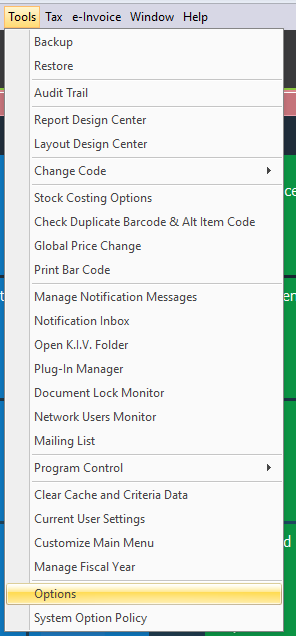
Click Invoicing > Document Transfer > Check the checkbox ‘Copy Creditor Note to Purchase Document Note’
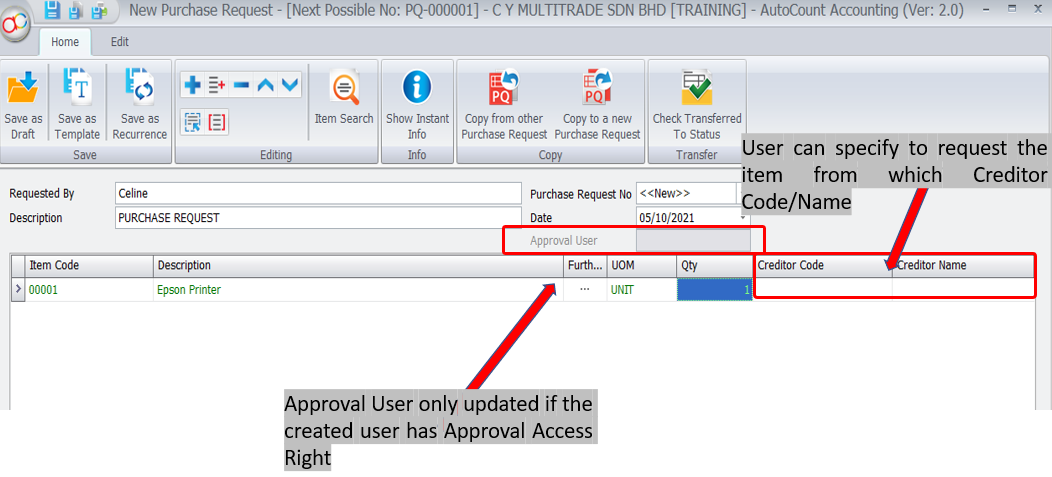
7.2 Purchase Request
- An entry to record any stock item requested by internal staffs
- Transaction entry behave similarly to other transaction
- Does not deduct stock and affect accounts
- Can transfer to Request Quotation and Purchase Order
- Without Approval, cannot transfer to other document
- Included reports:
- a) Purchase Request Listing
- b) Purchase Request Detail Listing
- c) Outstanding Purchase Request Listing
- d) Outstanding Purchase Request Detail Listing
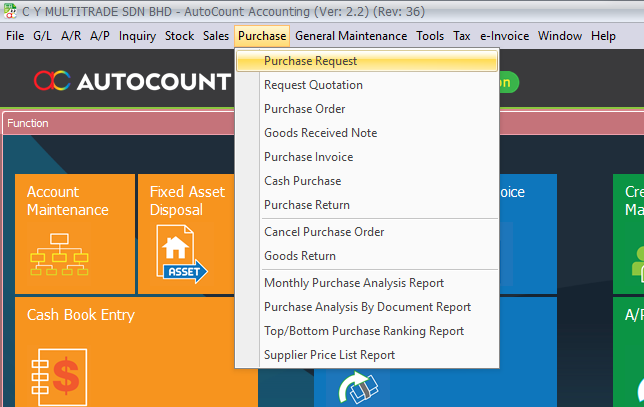
Go to Purchase > Purchase Request
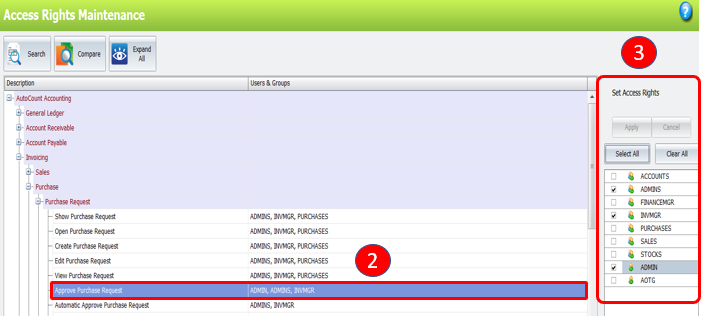
Go to General Maintenance > Access Right Maintenance (1)
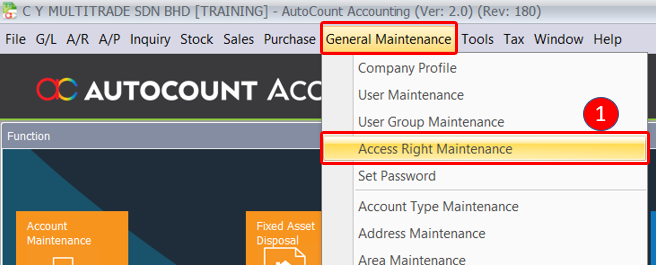
Click Approve Purchase Request (2), you can set the access right (3) who can access to the selected function
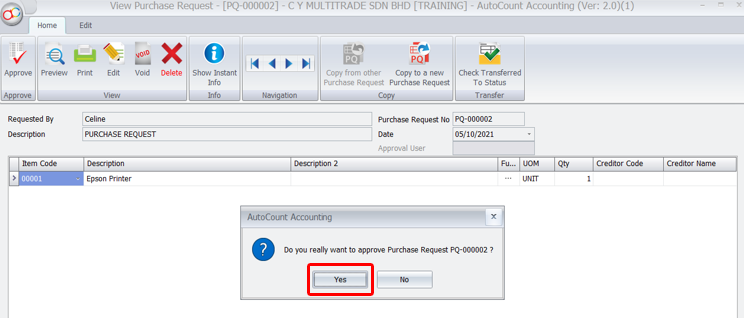
The Purchase Request haven’t approve, click on Approve button
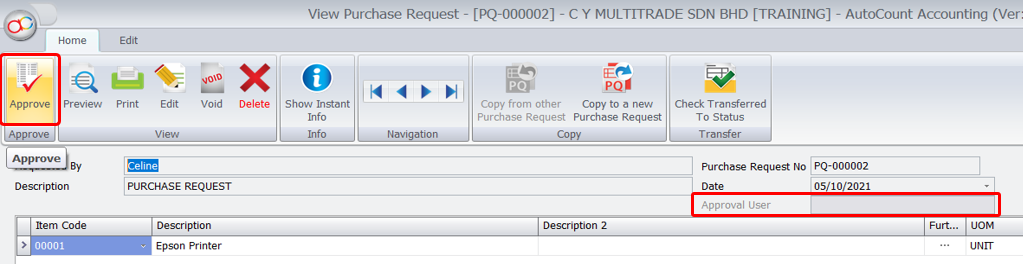
Click Yes to approve the Purchase Request
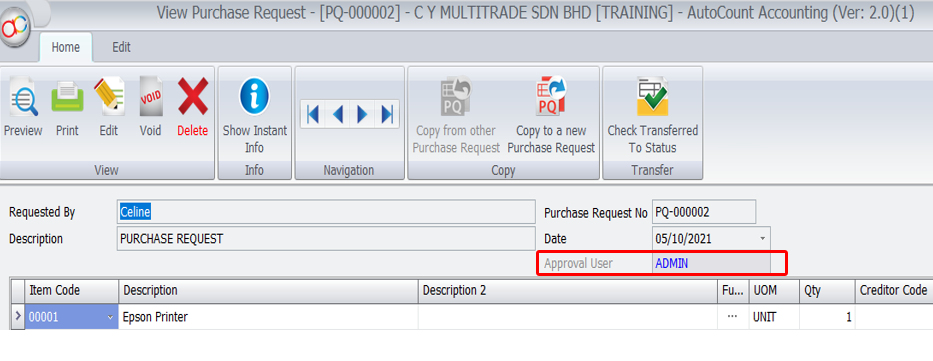
You can view the document was approved by who
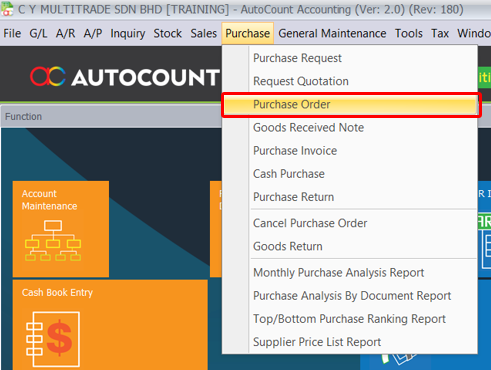
Go to Purchase > Purchase Order > New

Click ‘Transfer from Purchase Request’
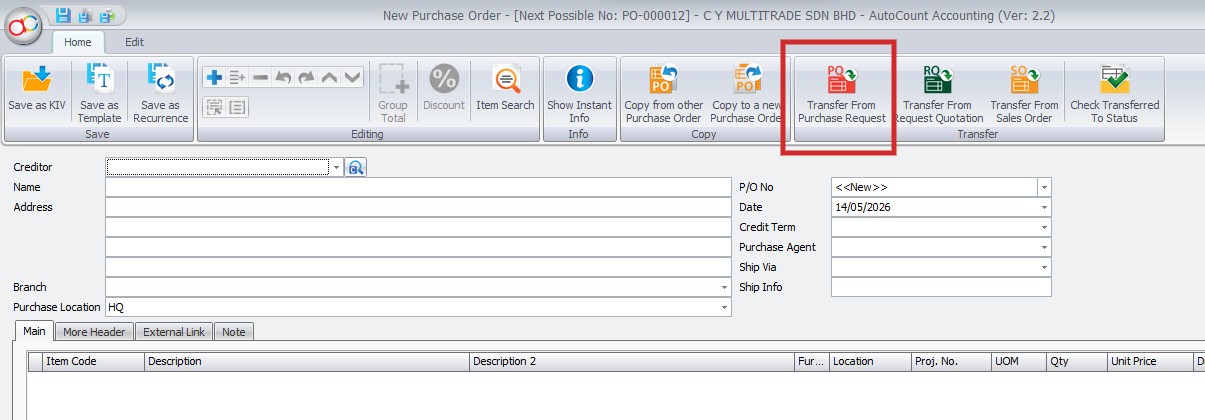
Tick the Purchase Request > Click OK to copy

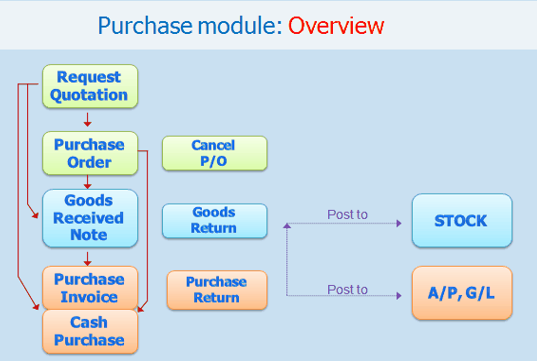
7.3 Purchase Invoice
Purchase invoice is
- For create, edit or print Purchase Invoice
- Will affect inventory movement (Increase Stock Level) if
- a) New Added-key in by using Purchase Invoice (without transfer from other document)
- b) Transfer from Request Quotation
- c) Transfer from Purchase Order
III. Will NOT affect inventory movement (Increase Stock Level) if
- a) Transfer from Good Received Note (Stock Level increase while created and saved in Good Received Note
- Will Posted to AP Invoice Entry upon Save (if the Post to GL and Post to Stock is Clicked)
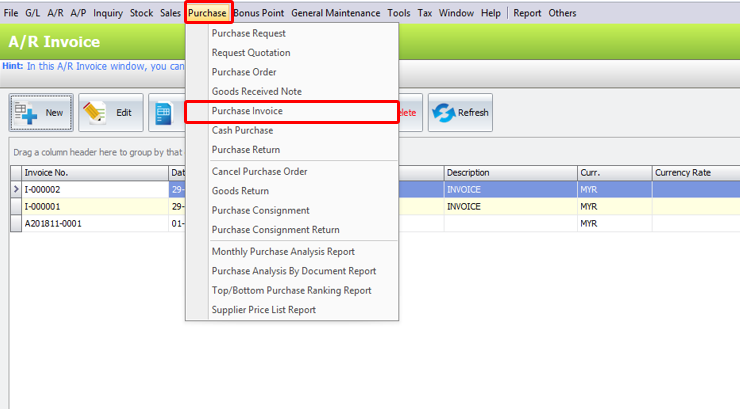
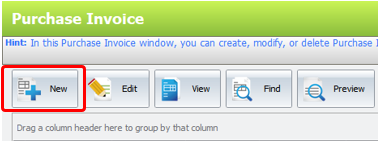
To Create New Purchase Invoice. Go to Purchase > Purchase Invoice > Click on Create A New Purchase Invoice
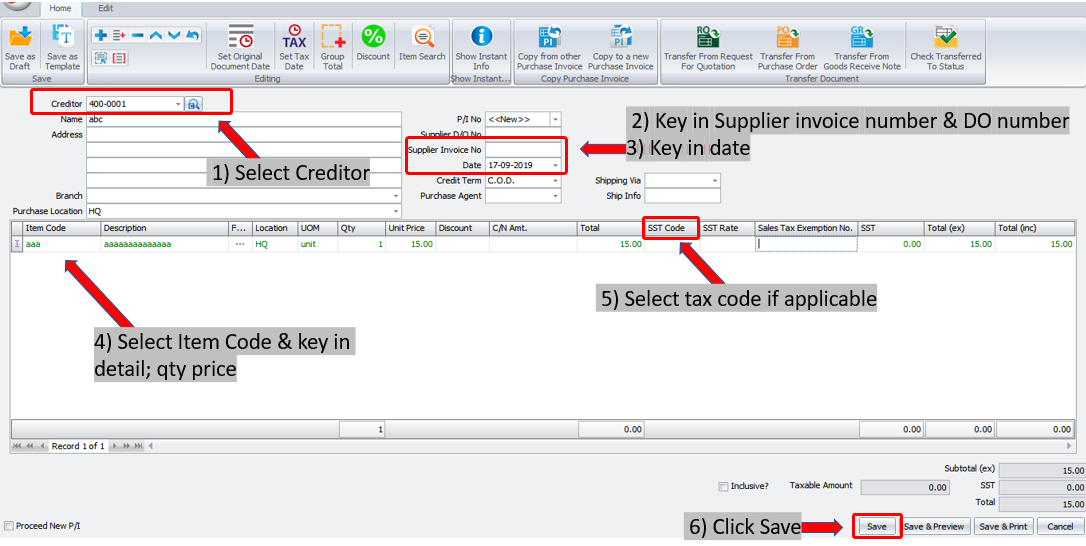
Notes:
1. Creditor: will be displayed automatically (as per transferred document)
2. To/Address: the info will be displayed according to selected creditor code.
3. Branch: specify the branch of this creditor (if any)
4. P/I No: <<New>> means to follow auto-running numbering (maintained at Document Numbering Format Maintenance), and the next possible number is displayed at the top bar of the window. You may click on it to key in any number you like.
5. Supplier D/O No.: will be captured from Goods Received Note.
6. Supplier Invoice No.: key in supplier Invoice number.
7. Date: system date is automatically captured, you may click to change.
8. Credit Terms: the default credit terms of this creditor will be displayed.
9. Purchase Agent: assign a purchase agent (if any). The default Purchase Agent can be assigned in Creditor Maintenance.
10. Ship Via: assign the shipping method (maintained at Shipping Method Maintenance)
11. Shipping Info: key in the info of shipping or transportation.
Details Column:
| Item Code: click on ‘+’ sign to add a new row and select an item; you may key in the first few number/letters of the item code/description and select from the lookup screen |
| Description: this is a called detail desicription…will capture the item description automatically (amendable) |
| Further Description: click to view/edit the further description of the item (the default content can be maintained and set at Stock Item Maintenance) |
| UOM: the default unit of measurement will be captures |
| Qty: key in the quantity |
| Unit Price: the selling price will be captured (either Standard Selling Price or according to the setting in Tools > Options > Invoicing > Auto Price) |
| Discount: you may key in the discount for any particular detail row. The discount could be value, a percentage, or a multi-level discount |
| C/N Amount: to key in C/N amount when there was a C/N to reduce cost price (not affecting stock quantity) so that the costing is accurately updated |
Total: this is the line total (net) Total (ex): to show the subtotal before tax Total (inc): to show the subtotal after tax |
SST Code: to show the SST code SST Rate: to show the rate of SST SST: to show the amount of SST |
| Subtotal (ex): to show the net total amount before tax |
| Outstanding: to show the outstanding payment of this document; will be filled upon saved |
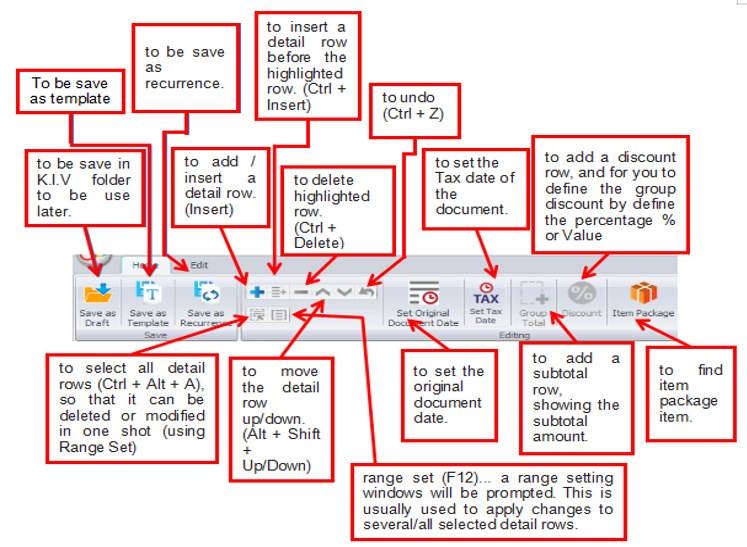
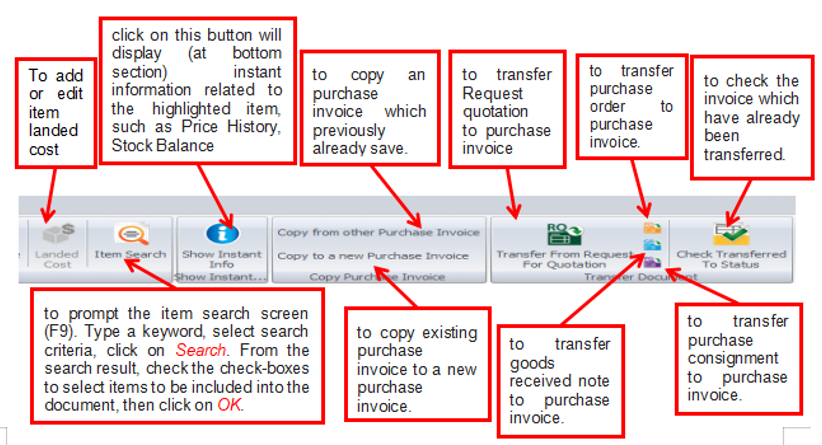
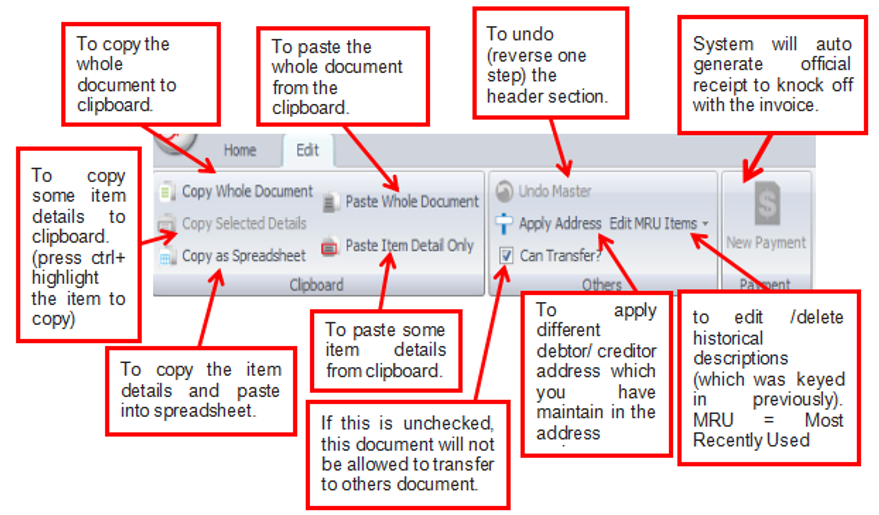
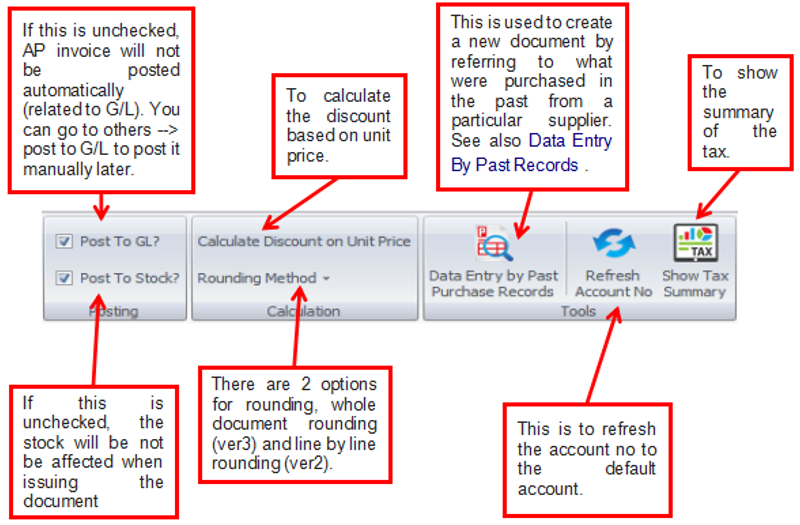
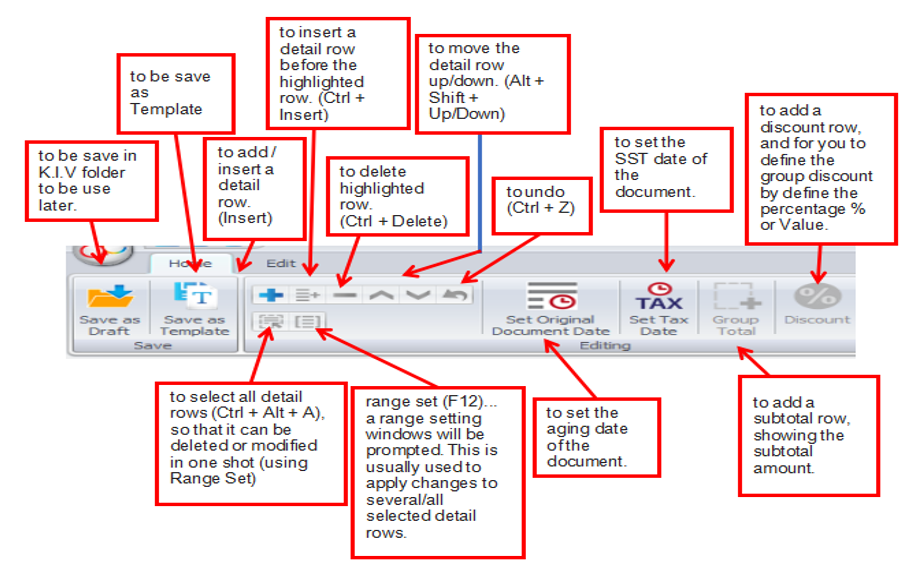
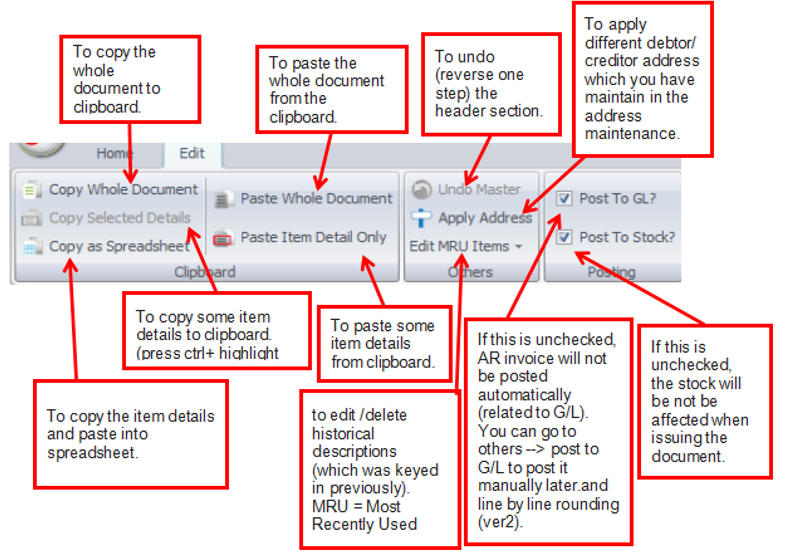
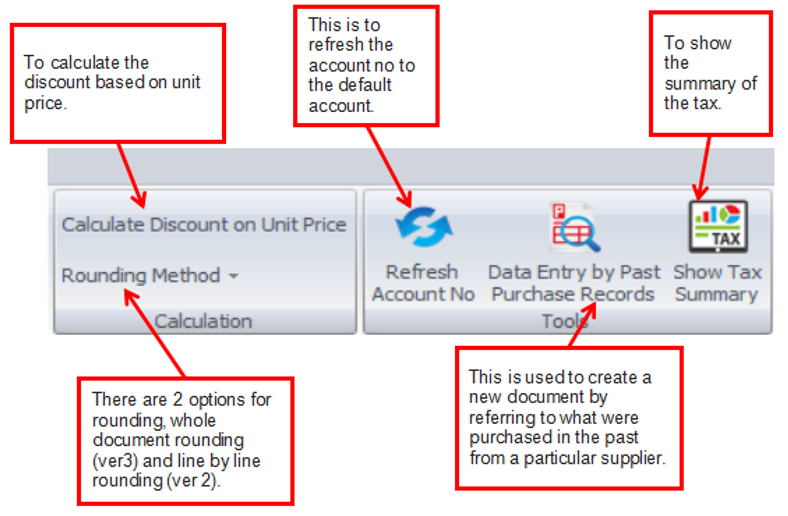
Functional Buttons
Edit Tab
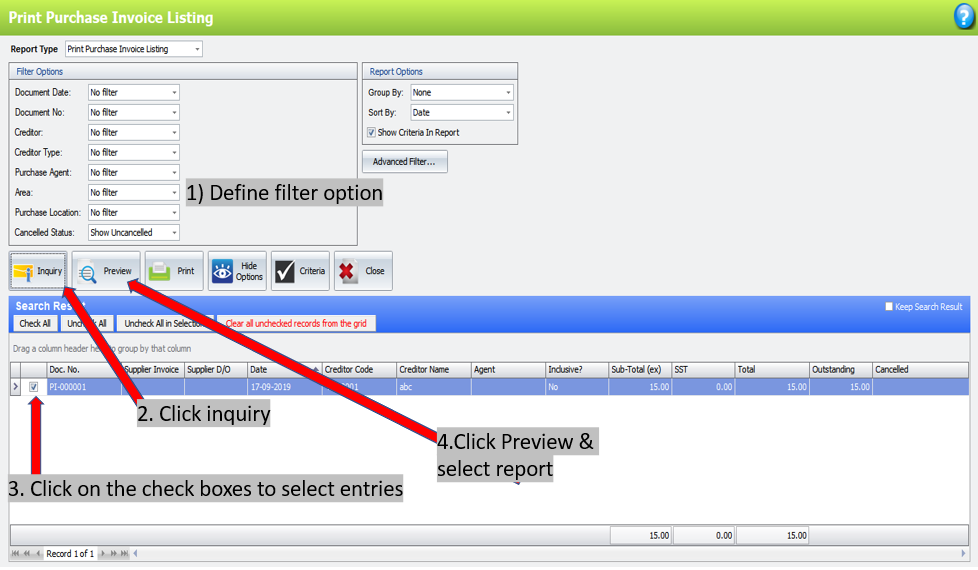
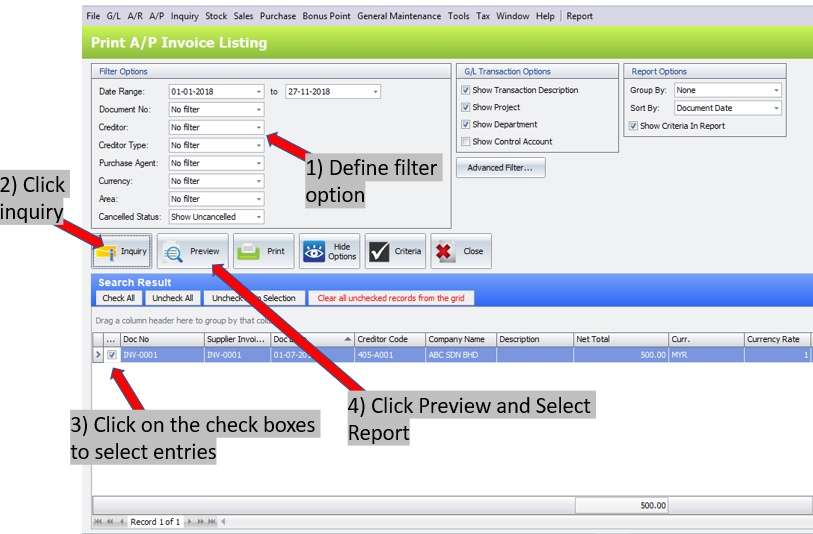
Step to print Purchase Invoice Listing

7.4 Purchase Return
This is to create, edit, or print Purchase Return
Purchase Return is used when there was a goods return (involved physical stock movement) or change in item price, otherwise (if it involves only a change in total amount) use A/P Credit Note instead.
Purchase Return must transfer from Purchase Invoice
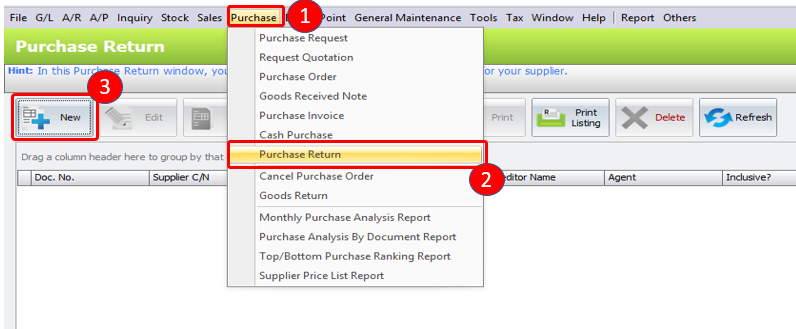
To create New Purchase Return, go to Purchase (1) > Purchase Return (2) > Click on New to create (3)
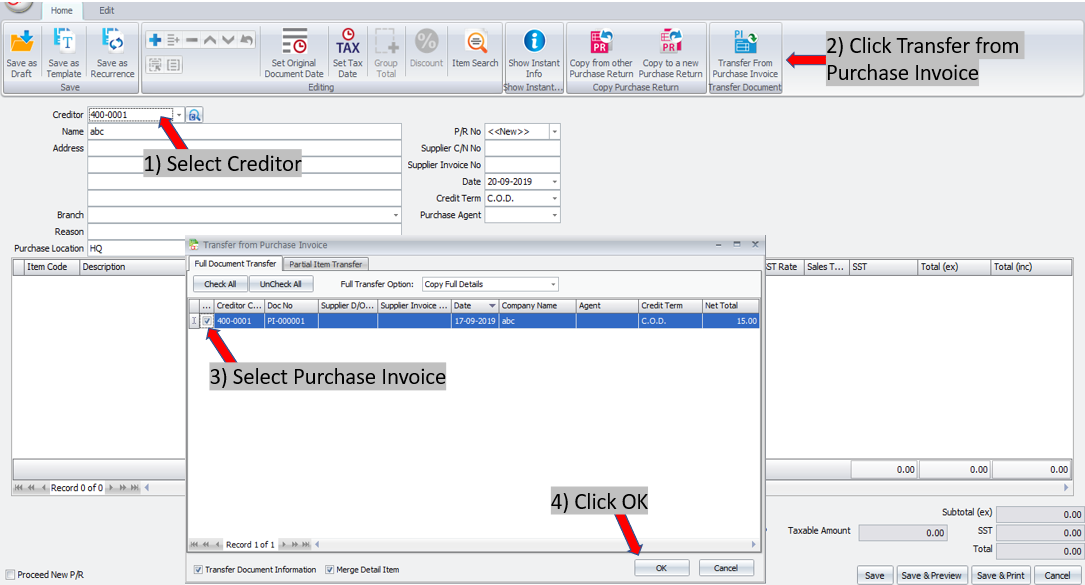
| Creditor: key in the first number/alphabet, OR click on the drop down arrow button, OR click on Search button to assign/select a creditor number |
| To/Address: the info will be displayed according to selected creditor code |
| Branch: specify the branch of this creditor (if any) |
| P/R No: means to follow auto-runing numbering (maintained at Document Numbering Format Maintenance), and the next possibl number is displayed at the top bar of the window. You may click on it to key in any number you like |
| Supplier C/N No: key in supplier Credit Note number |
| Supplier Invoice No: key in supplier invoice number |
| Date: system date is automatically captured, you may click to change |
| Credit Terms: the default credit terms of this creditor will be displayed |
| Purchase Agent: assign a purchase agnt (if any). The default Purchase Agent can be assigned in Creditor Maintenance |
Functional Buttons

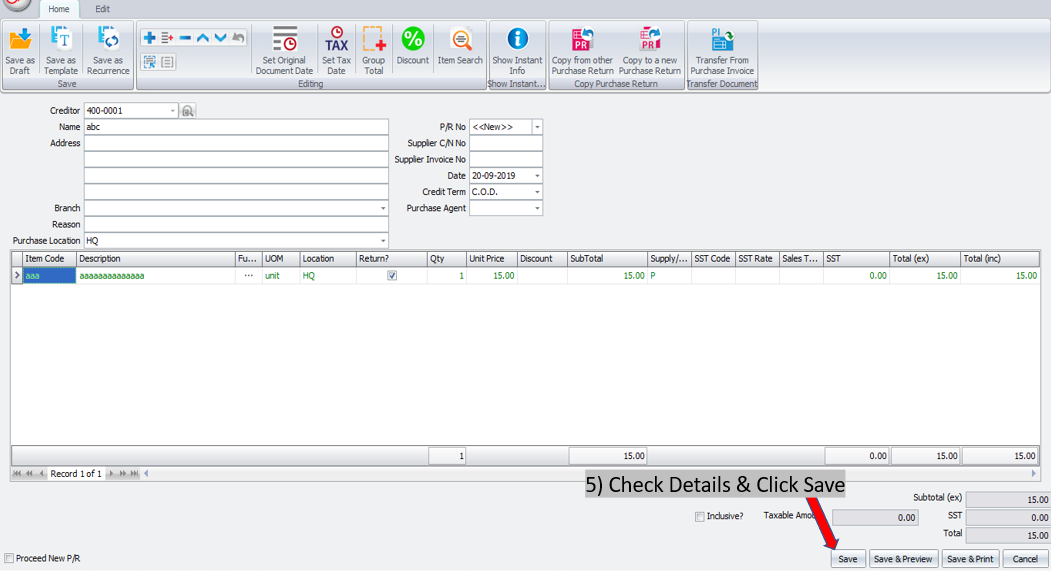
Details Column
| Item Code: click on ‘+’ sign to add a new row and select an item; you may key in the first few number/letters of the item code/description and select from the lookup screen |
| Description: this is called detail description…will capture the item description automatically (amendable) |
| Further Description: click to view/edit further description of the item (the default content can be maintained at Stock Item Maintenance) |
| UOM: the default unit of measurement will be captured |
| Qty: key in the quantity |
| Unit Price: the selling price will be captured (either Standard Selling Price or according to the setting in Tools > Options > Invoicing > Auto Price) |
| Discount: this is called column discount; you may key in the discount for any particular detail row. The discount could be a value/a percentage/multi-level discount |
SubTotal: this is the line total (net) Subtotal (ex) to show the net total amount before tax |
SST Code: to show the SST code SST Rate: to show the rate of SST SST: to show the amount of SST |
Total (ex): to show the subtotal before tax Total (inc): to show the subtotal after tax |
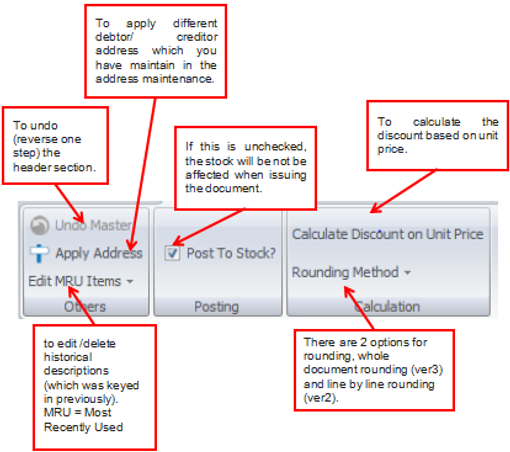
| Proceed New Invoice: when this is checked, a fresh screen will be ready for new document upon Save; if unchecked will exit the transaction screen upon Save |
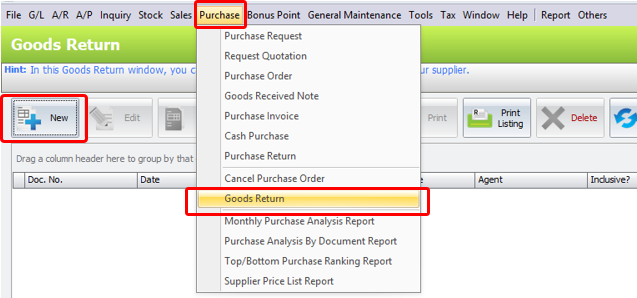
7.5 Goods Return
Goods Return is used when goods received from supplier (Goods Recevied Note is created) is fully or partially returned Purchase Invoice is received
This entry will keep the outstanding Goods Received Note updated (so that accurate invoice can later be issued), and it will update the stock level as well
To create a new Goods Return, go to Purchase > Goods Return > click on New to create
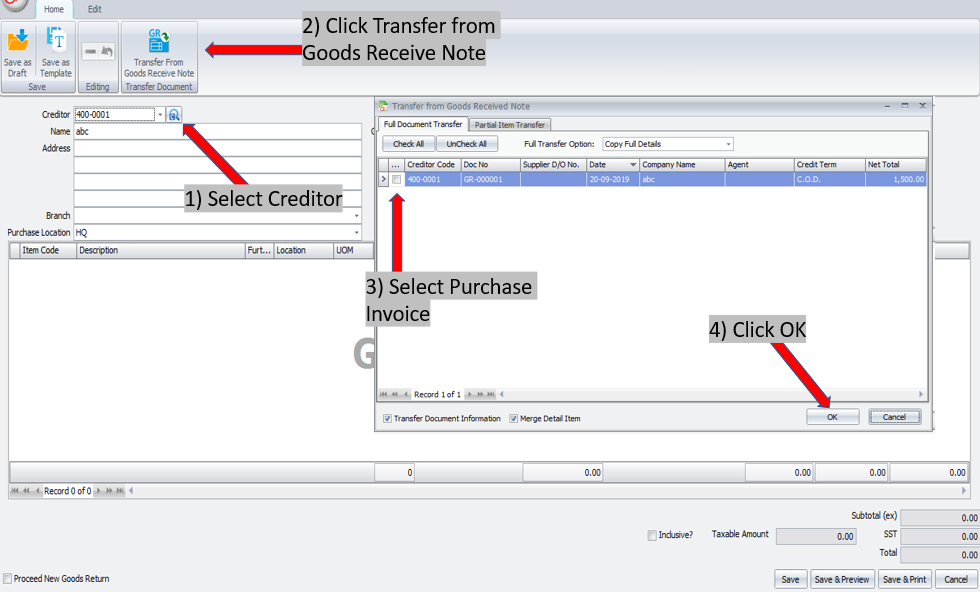
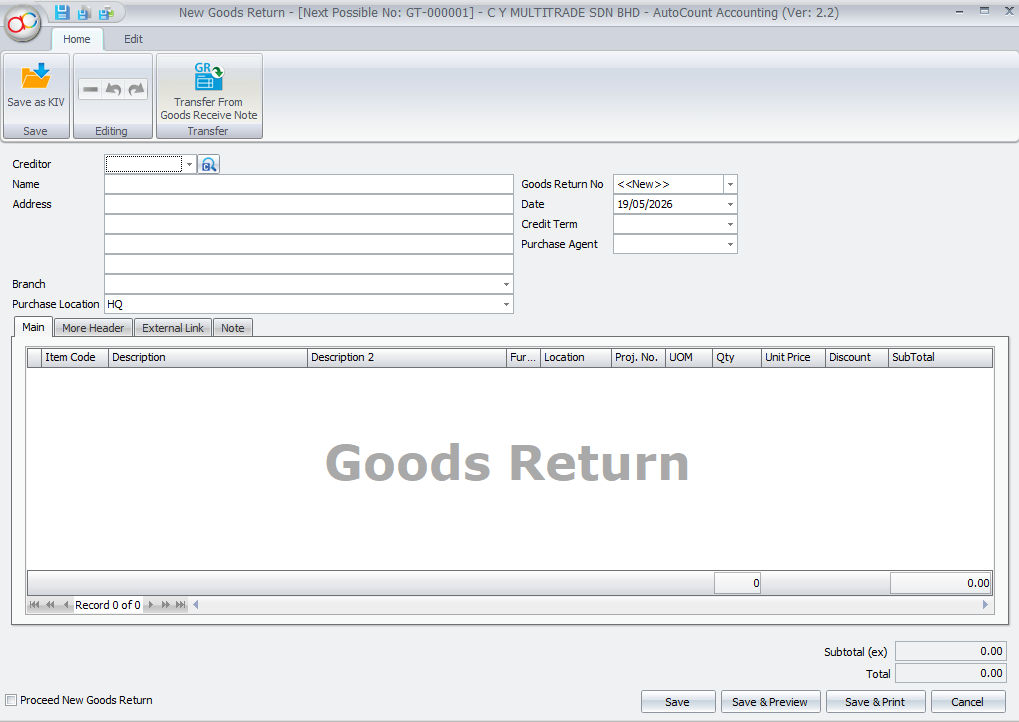
1. Creditor: will be displayed automatically (as per transferred document)
2. Name/Address: the info will be displayed according to selected creditor code
3. Branch: specify the branch of this creditor (if any)
4. Goods Return No: means to follow auto-runing numbering (maintained at Document Numbering Format Maintenance), and the next possible number is displayed at the top bar of the window. You may click on it to key in any number you like
5. Date: system date is automatically captured, you may click to change
6. Credit Terms: the default credit terms of this creditor will be displayed
7. Purchase Agent: assign a purchase agent (if any). The default purchase agent can be assigned in Creditor Maintenance
Functional Buttons:

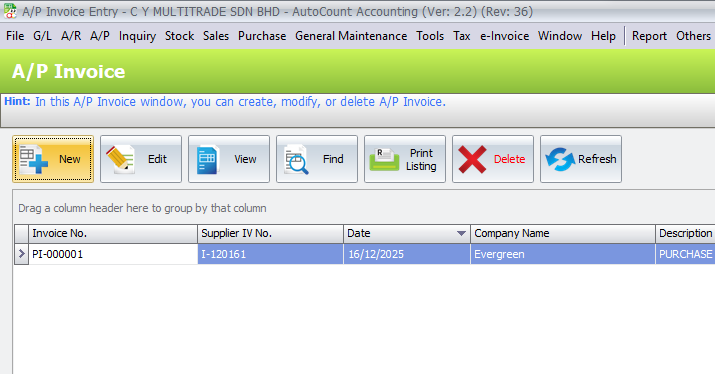
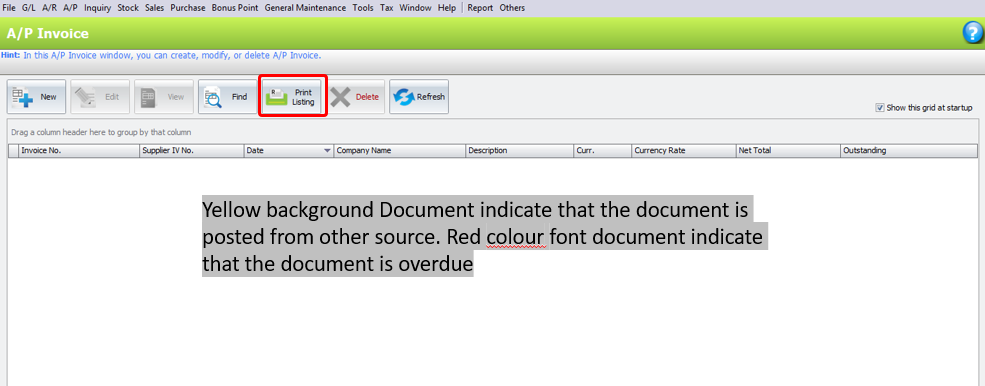
7.6 A/P Invoice
This is to create, edit, or view A/P Invoice Entry
- Different from Purchase Invoice though they are both involving creditors;
- An accounting entry (no bill printing); while Purchase Invoice is a billing document (invoice can be printed)
- Will automatically update the related G/L accounts (upon save); Purchase Invoice will post automatically (depends on option setting) the entries to A/P Invoice Entry and update the related G/L accounts (upon save)
- Mainly used when you are not using Invoicing system; You are not allowed to edit A/P Invoice Entry if it was posted from other source (Purchase Invoice)
To create a new A/P Invoice Entry, go to A/P > A/P Invoice Entry
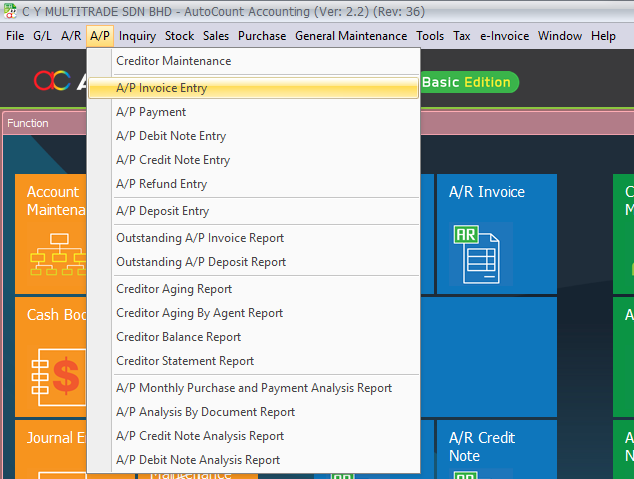
Click on New to create
Notes:
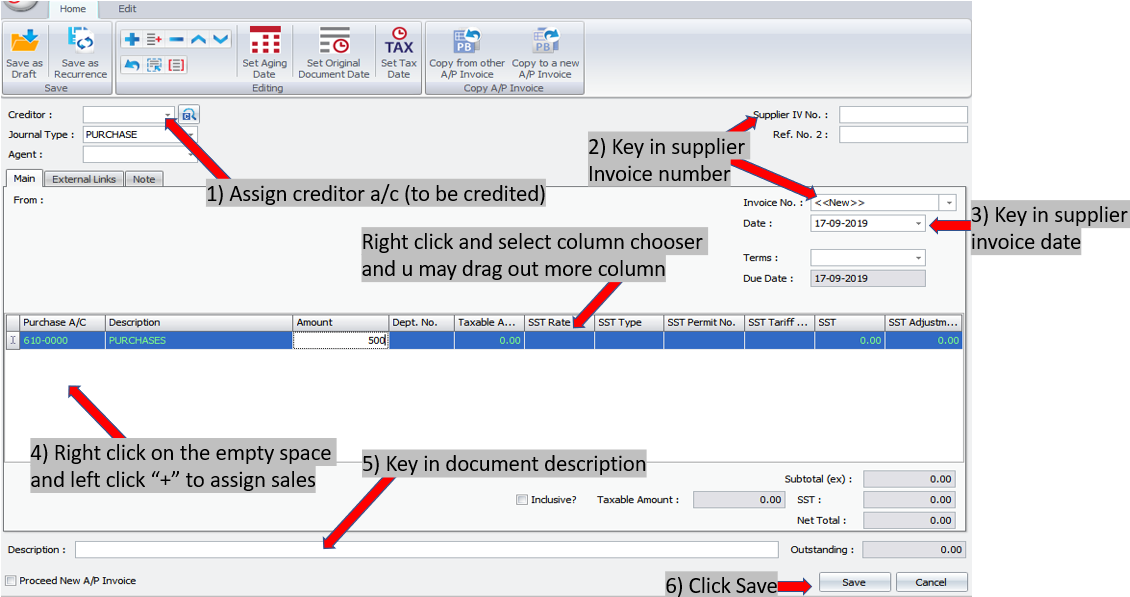
1. Creditor: key in the first number/alphabets, OR click on the drop down arrow button, OR click on search button to assign/select a creditor number
2. Journal Type: you may select the journal type if you have maintained more than one journal type belonged to this Entry Type
3. Agent: assign a purchase agent (if any)
4. Ref. No. 2: key in other reference number if any
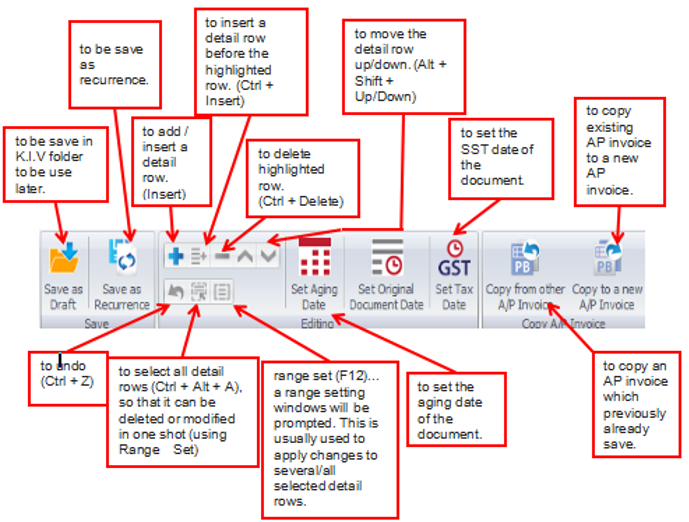
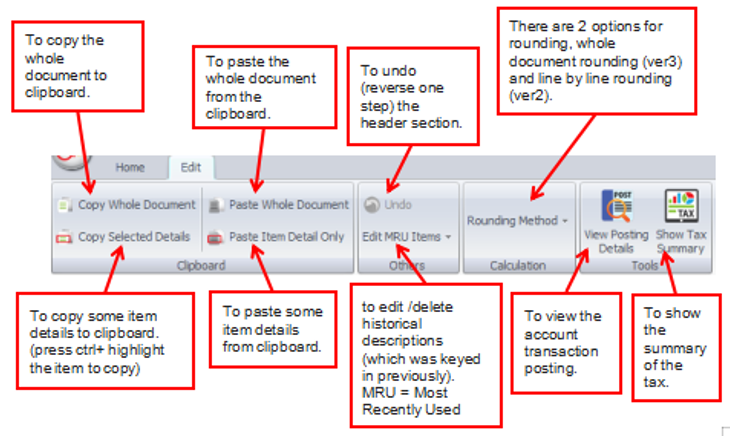
Functional Buttons:
A/P Invoice Entry Listing

A/P Invoice VS. Purchase Invoice (Both Involved Creditors)
| A/P Invoice Entry | Purchase Invoice Entry |
| a) Is an accounting entry | a) Billing Document (Purchase Invoice can be printed) |
| b) Will automatically update the related G/L Accounts | b) Will post the entries to A/P Invoice Entry & update the related G/L Accounts |
| c) Will not update the stock level | c) Will update the stock level if will stock control |
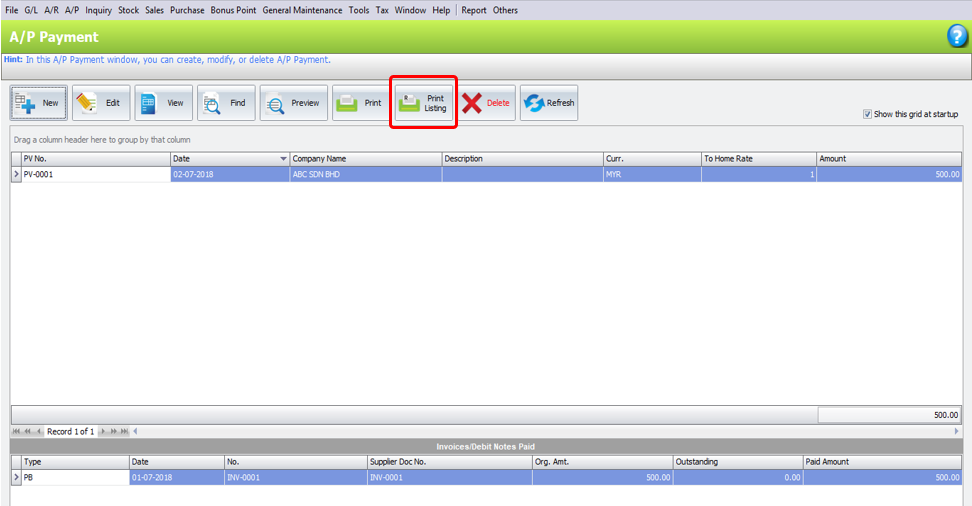
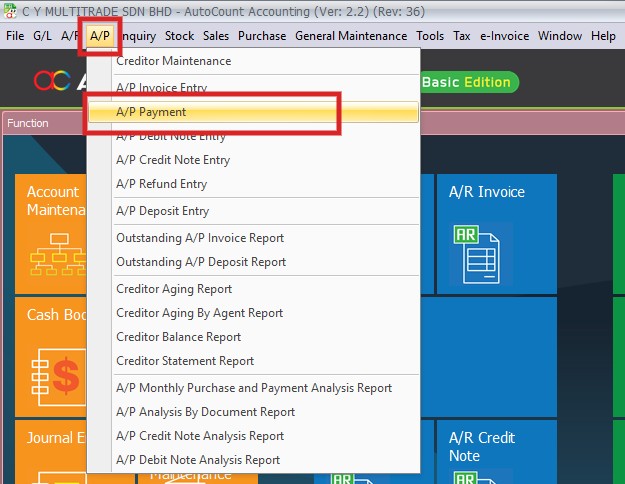
7.7 A/P Payment
This is to record full/partial payment made to creditor, knock-off related invoice(s) or Debit Note, and print payment voucher
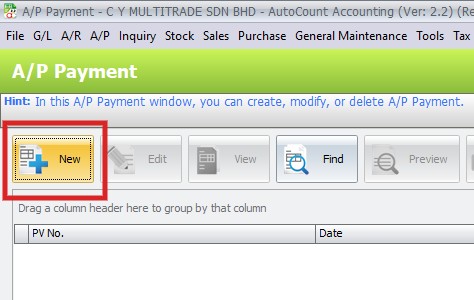
To create a A/P Payment, go to A/P > A/P Payment, click on NEW to create
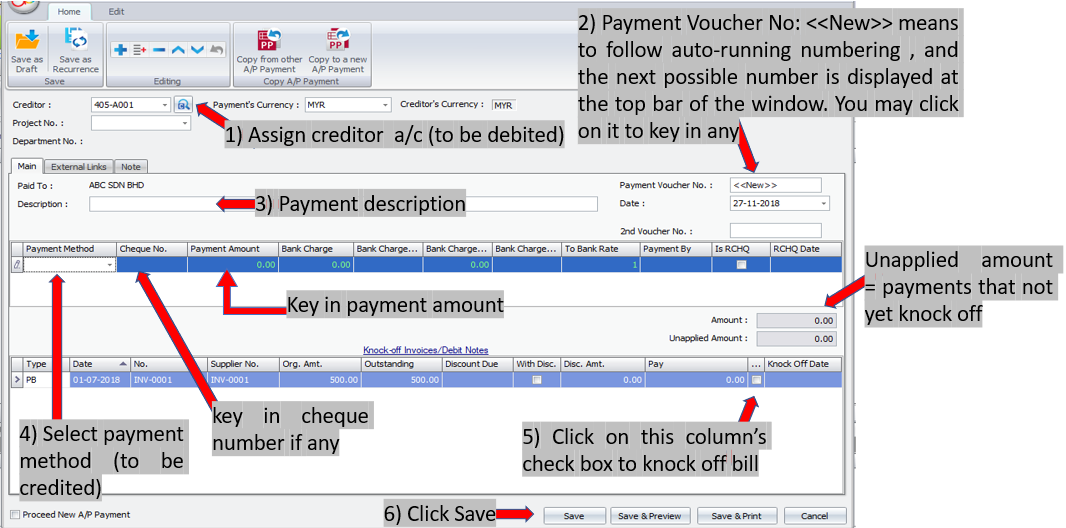
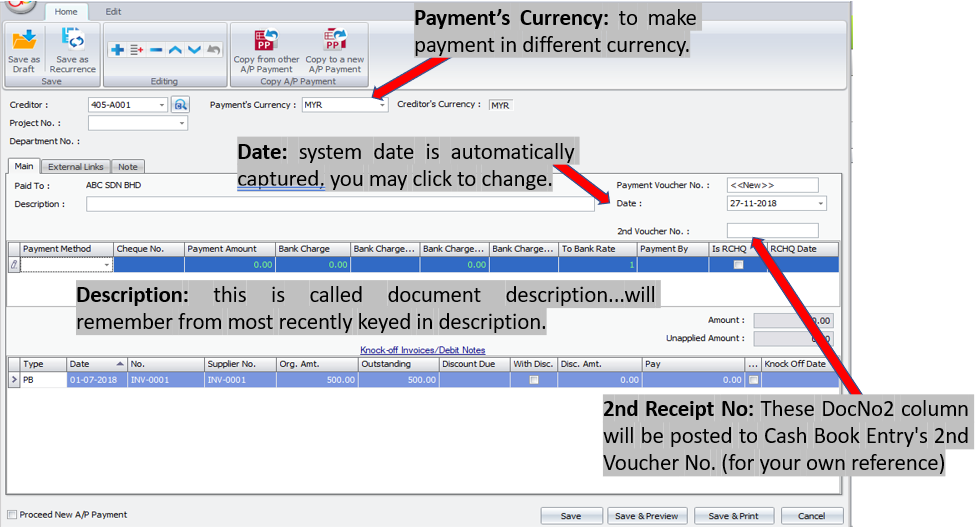
Details Column:
1. Payment Method: select a payment method. Click on ‘+’ to add a new row for multiple payment method 2. Payment Amount: key in the payment amount by this payment method 3. Bank Charge: key in bank charge value if any 4. Bank Charge Tax Code: to maintain bank charges tax code 5. Bank Charge Tax: the amount of SST for bak charges 6. Payment By: key in the mode of payment 7. Is RCHQ: this used when a cheque payment made earlier is returned/bounced (use Edit mode) 8. RCHQ Date: define the date when the cheque is returned/bounced 9. Amount: indicates the total payment amount of this entry 10. Unapplied Amount: to show the payment amount that has yet to knock off against Invoice/Debit Note. If there is any payment been saved with unapplied amount, message will be prompted when adding new Receive Payment offering to open and use the previous unapplied amount. |
Details Column-Knock Off Invoices/Debit Note section
1. Type: indicated the type of transaction 2. Org.Amt: indicated the original amount of the document before any knock off 3. Outstanding: indicates the amount of the document that yet to pay 4. Discount Due: indicates the due date for early payment discount (refer to Credit Term Maintenance) 5. With Dis: to indicate the document is entitled for discount; check to key in discount amount; CN will be generated 6. Disc Amount: to key in the discount amount (or auto-calculated based on early payment discount); the outstanding amount will reduce accordingly 7. Pay: the knock off amount. Click on this column header to automatically fill in the knock off amount 8. Knock Off Date: the date when the document being pay or knock off (the date must be equal or greater the document date) 9. Proceed New A.P Payment: when this is checked, a fresh screen will be ready for new entries upon SAve; if unchecked will exit the transaction screen upon Save |
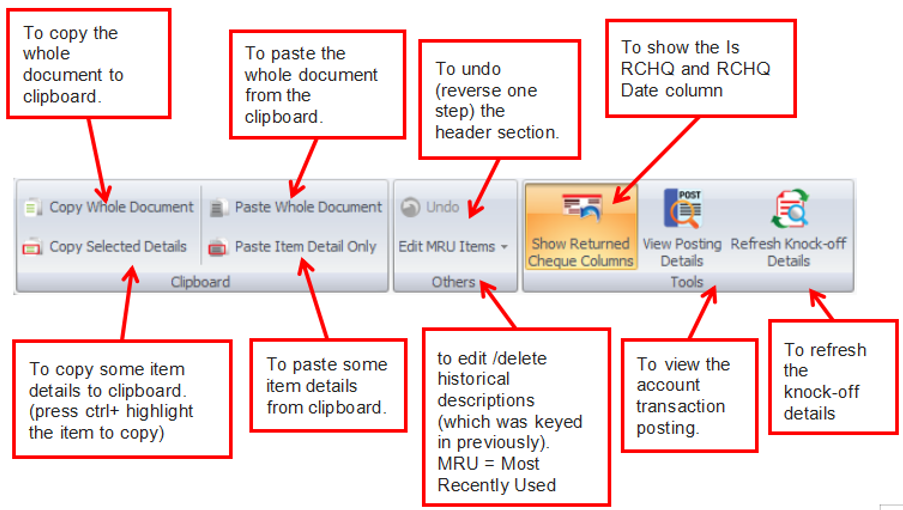
Functional Buttons:

Edit Tab Button
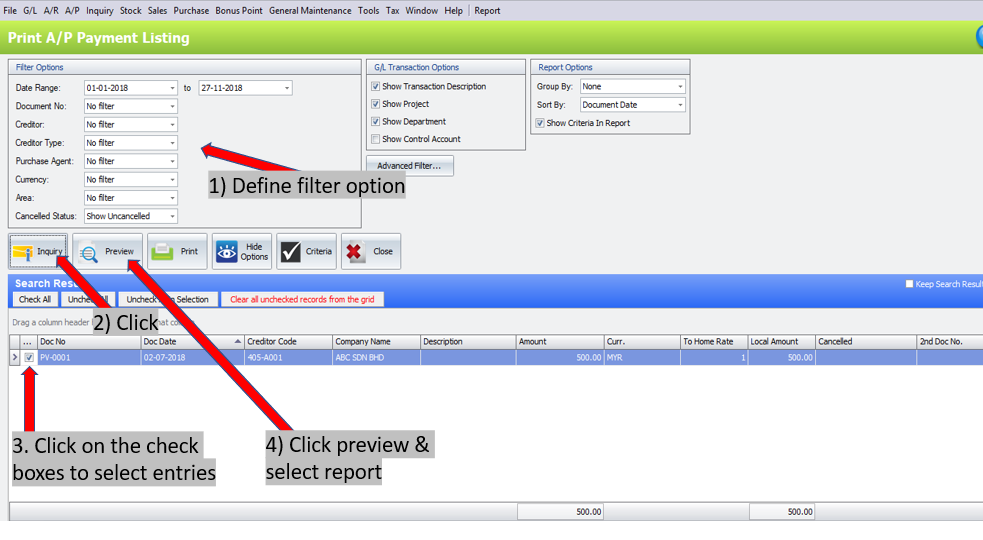
How to print A/P Payment Listing