
AutoCount New Release 2.2.33.50
1. Improve forms with knock off details to show more knock off lines
For users with high-resolution display settings, the Knock-Off Details section may not befullyvisibledue to limited screen space. To improve the viewing experience, a Minimize/Expand Ribbon button has been addedtotheGL, AR, and AP modules. Users can minimize the ribbon to free up more screen space and displaymoreKnock-Off lines.
Example:
- Click the Minimize button to minimize the ribbon and display more Knock-Off lines.

- Click the Expand button to restore the ribbon.

2. New Access Right to check or uncheck Submit e-Invoice at transaction
A new Access Right has been added to control which users are allowed to check or uncheck the Submit e-Invoice option in e-Invoice transactions.
When a user without this access right creates or edits an e-Invoice transaction, the Submit e-Invoice option will be displayed in grey and cannot be edited. This prevents unauthorized users from changing the e-Invoice submission setting.
To change the setting, go to General Maintenance > Access Right Maintenance

Expand AutoCount Accounting > e-Invoice > e-Invoice Setting > and you can change the users to allow them check or uncheck

3. Add import Past Year Price History with Excel
A new Import from Excel function has been added to allow users to import Past Year Price History records directly from an Excel file. This enhancement allows user to import their historical price for reference after our recent change into Price History behaviour.
Example:
- Go to AutoCount Accounting Management Studio > Data Consistency > Past Year Price History Maintenance > Import Option > Import from Excel


- Copy the past transaction from excel and click on Paste from Clipboard

- These records will also be available in the Sales > Price History Report, Inquiry > Stock Item Inquiry and transaction’s Show Instant Info, allowing users to view their price history conveniently


4. Enhance Show Instant Info Price History to add "Document Company Name"
The Price History section in Show Instant Info has been enhanced with a new Document Company Name field. This field displays the company name stored directly in the transaction document.
This enhancement makes it easier for users to identify which company a particular item was previously sold to or purchased from. In some cases, the company name associated with the Account Number may differ from the company name entered in the transaction document, usually Cash Sale. Previously, users needed to open the transaction document to verify the company name.
With the new Document Company Name field, users can view the company name directly from the Price History section, making it easier and faster to trace past selling or purchase prices.

5. Add Function to rekey Client ID and Client Secret to handle key renewal after expiry
A new function has been added to allow users to rekey the Client ID and Client Secret when the existing Client Secret is expired or needs to be renewed. This allows users to update the e-Invoice credentials without having to reconfigure the e-Invoice settings from the beginning.
Example:
- Go to e-Invoice > e-invoice License Setting > e-Invoice Status. Click Reactivate e-Invoice on AIP server under the e-Invoice Status

- Click Reset button

- A confirmation message will be displayed, click Yes to proceed. Enter the ADMIN password when prompted

- The success message will prompt out. After the reset is completed successfully, the existing Client ID and Client Secret fields will be
cleared. Enter the latest Client ID and Client Secret which generated under MyInvoice Portal

6. Support to save different Accounting Basis Tax Type in document
In the previous version, the system did not allow different accounting basis tax types to be saved in the same document due to tax calculation limitations. This feature has been enhanced to allow Accrual Basis and Payment Basis tax types to be saved in the same document.
Example:
- Accrual basis: S-10, Payment basis: SV-6

- Create a sales invoice and select both tax codes. The system now allows the document to be saved successfully

- Under SST Instant Info, the sales tax amount will be shown after the sales invoice is created, as it is based on Accrual Basis

- After payment is made within 12 months, the service tax amount will be shown under SST Instant Info, as it is based on the Payment Basis

*This also able to support at Purchase where sometimes supplier will bill both different tax in one invoice, and now you can key exactly the same in AutoCount
7. New Auto Bank Reconciliation Function (BETA)
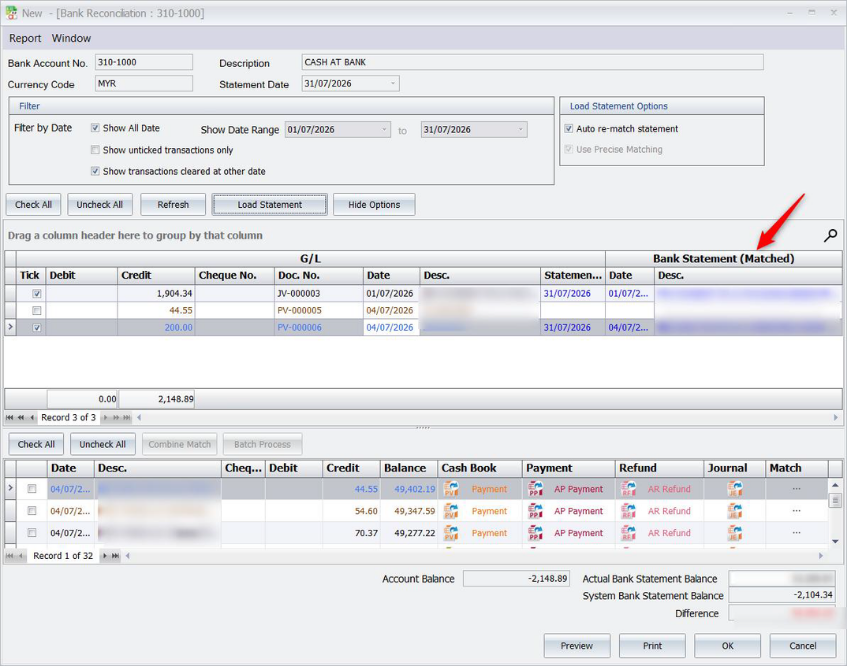
An auto bank reconciliation feature has been added in this revision. Instead of manually ticking each transaction, users just need to load their bank statement (in PDF or CSV format) into GL > Bank Reconciliation, and the system will automatically match the transactions. This saves a significant amount of time when checking transactions against the bank statement.
*This function is currently BETA
The walkthrough below shows how auto bank reconciliation works in the system, starting with loading a bank statement, followed by some other ways the transactions can be matched.
- Go to GL > Bank Reconciliation, create new for 310-1000 Bank account

- Click on the Load statement. A download dialog will appear to download required components for this Auto Bank Reconciliation function. A dialog box will also appear to inform that this function is currently under BETA stage. Click Yes to use this functionality (appear 1st time only) and select your bank statement


- After the bank statement is loaded, the Actual Bank Statement Balance is filled in automatically. The system also automatically checks any bank transaction whose description, document date, and amount match the bank statement
8. New Function e-Invoice Submission Summary
A new e-Invoice Submission Summary function has been added to the e-Invoice module. This summary provides users with a clear overview of the number of e-Invoice transactions that have been submitted, including the number of transactions with Valid and Invalid submission statuses.
This enhancement allows users to quickly review the e-Invoice submission status across different document types without having to check each transaction individually.


9. Enhance e-Invoice Submission Status to add Supplier Information
Several new columns have been added to the e-Invoice Submission Status Screen, including Supplier Name, Buyer Name, Subtotal exclude Tax, Tax, Total, Currency Code, and Currency Rate.
This enhancement allows users to view this information directly on screen, without having to open each e-Invoice transaction individually.

10. Add Audit Trail record for triggering Company Profile Share Company Tax Information
A new Audit Trail record has been added to track when a user shared the Company Tax Information via Share Company Tax Information (General Maintenance > Company Profile).
This enhancement allows users to identify who shared out the Company Tax Information, addressing this sensitive data.

11. Enhance Batch Mail to support email message template function
The Batch Mail function in AR > Debtor Statement Report has been enhanced to support Email Message Templates. Users can create and save frequently used email messages as templates and select the required template when sending batch emails.
This enhancement reduces the need to manually enter the same email message each time and makes the batch mailing process more efficient.
Example:
- Go to AR > Debtor Statement Report, inquire the required records, and click Batch Mail. Select the required report format

- Click on the + icon, add a Statement Email Template

- Enter the required email content. Click the Information icon to view the supported parameters that can be used in the email body. Save the email template after completing the content

- In the Message section, select the saved email templates to use for batch mail

- You saved message will appear automatically. Proceed to send the batch mail

- After the batch mail is sent successfully, the email records can be viewed in the Server Mailing List

- A Manage Template button is also available to allow users to create, edit, and delete the saved email message templates

12. Enhance Debtor Statement when Preview only 1 Debtor to capture its Statement Email address
The Debtor Statement function has been enhanced to automatically capture the Statement Email address maintained under Debtor Maintenance when previewing the statement for a single debtor.
When users select Send by Email (via SMTP Server) or Send by Email (MS Outlook Compatible), the system will automatically capture the debtor’s Statement Email address.
This enhancement provides another kind of convenience to users comparing to previous version where the email address was not captured and must be keyed manually.
Example:
- Go to AR > Debtor Statement and inquire the required debtor

- Click Preview and select the debtor statement to preview

- Click Send by Email (via SMTP Server). The system will automatically retrieve the Statement Email address maintained under Debtor Maintenance

- Enter the required email message and send the email
*Ensure the required Email Settings have been configured before sending the email


13. Enhance Sales and Purchases Transaction Command form to show TIN and IdentityNo
The Sales and Purchase Transaction Command forms have been enhanced to support displaying TIN and IdentityNo (BRN/NRIC/Passport) as available columns.
Users can now add these fields to the Transaction Command form to view the debtor’s or creditor’s TIN and IdentityNo directly from the transaction listing.
The enhancement applies to transactions in the Sales and Purchase modules, except for Purchase Request.
This allows users to check the debtor’s or creditor’s TIN and IdentityNo directly from the transaction listing without having to open each transaction individually.

14. Enhance to key ADMIN password when Save Tax Entity that is already assigned in Company Profile
The Tax Entity information may be accessible to users who are responsible for maintaining customers or suppliers. As a result, users may be able to view the company’s Tax Entity information and could accidentally modify the details.
To prevent unauthorized changes, the system has been enhanced to require the ADMIN password when a user attempts to save changes to a Tax Entity that is already assigned in the Company Profile.
When the user modifies the Tax Entity information and clicks Save, the system will prompt for the ADMIN password before allowing the changes to be saved.
This enhancement provides an additional security control to prevent accidental or unauthorized changes to the company’s Tax Entity information.
